Job : Application Tracking System Basics
Overview
provides full transparency into the status of your candidates throughout the various steps of the recruitment process. The Application Tracking System () is aimed to help you be more productive so you can focus on placing the best candidates into the right positions.
is a tool for tracking candidates within a job funnel, designed for speed, efficiency, and volume. enables quick-action movements from one stage to another in a single workspace, from sourcing to placement, including mass placement.
is designed to work with Salesforce Lightning only.
This article explains how to use the component available from Job records for tracking multiple candidates through a single Job cycle.
A separate section focuses on the component available from Contact records to track the progress of single candidates through every Job to which they have been applied.
Admin Note:
functionality leverages a junction object called . Each time a Candidate is added to a Job using the , an record is created in the background with the following data:
- Job Name
- Candidate Name
- Stage (TR1__Stage__c).
The main function of the object is to store historical data and to help facilitate reporting. End users do not need to update or edit these records. All operations that pertain to the application process can be performed from the ATS component with updates sent to the records through the use of triggers. See ATS v2: Application V2 Data Model for more information.
Accessing
To access the , click the ATS tab from a Job record. From there you’ll see the list of Candidates associated to the Job. Each listing displays the applicant's name and the stage of the recruiting process they're in for the Job.

There are two views available:
- List View (the default view)
- Kanban View
Users can switch from one view to the other by clicking the Switch to icon  . The same data and actions are available in both views.
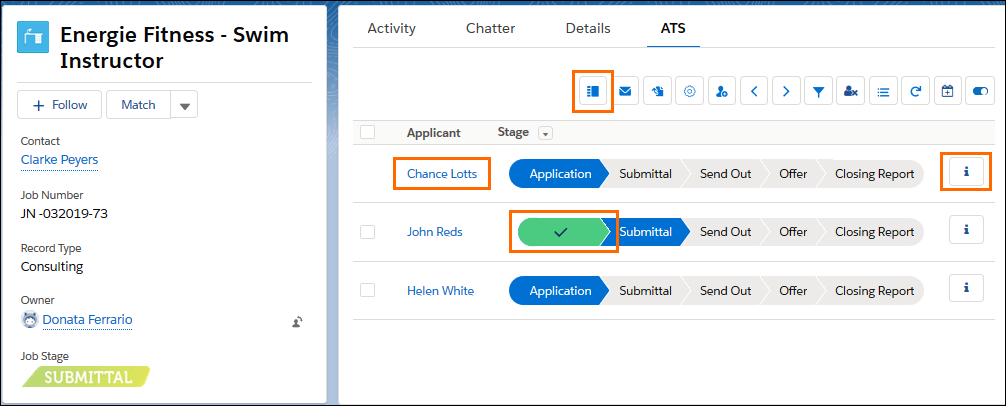
List View
The List View focuses on the list of Candidates that have been applied to the Job and highlights the stage that each candidate is currently in using color-coded chevrons. You can click the name of the Candidate to navigate to the corresponding Contact record.
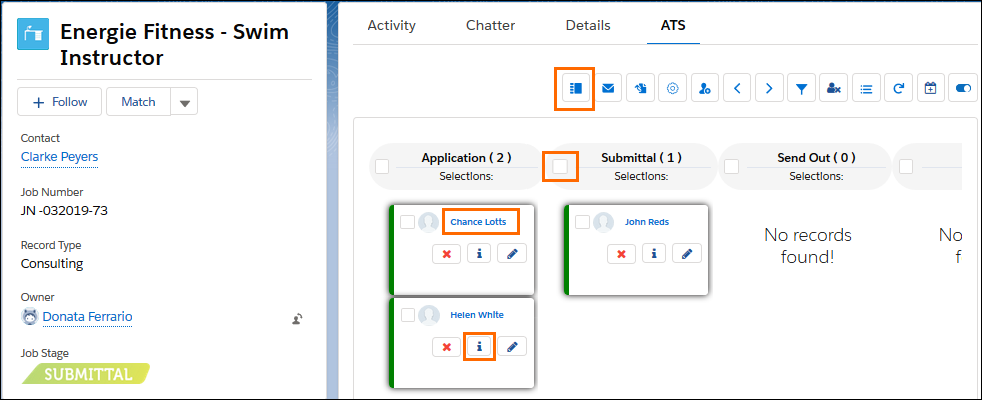
Kanban View
In the Kanban View, each card represents a Candidate. This view focuses more on the status of filling the Job. This includes displaying how many Candidates there are per stage, how many Candidates are being interviewed, and how many Candidates have been offered the Job.
Key Features
- Actions Toolbar
- Candidate Name (links to the Contact record)
- Job Stages
- Information button to view the record.
Accessing These Features
List View
Kanban Board
Admin Note:
There are several customization options available for the List View and Kanban View:
In the List View, two columns are displayed out of the box: Candidate and Stage. It's possible to add additional columns by editing this Field Set:
- Setup > Build > Create > Objects > > Field Sets > Lightning List Tab.
The Kanban View displays up to two fields on the card. To add or remove fields, navigate to the below Field Set:
- Setup > Build > Create > Objects > > Field Sets > KanbanCardLineFieldSet.
The number of Candidates visible in either view is customizable. To adjust this, navigate to Setup > Custom Settings > ATS Configuration Settings and enter the preferred number in List view records size and/or Kanban Record Size.
- For best performance, we recommended displaying no more than 50 Candidates per page.
Managing Candidates
You can select multiple Candidates and manage them all at once using the Move Forward, Move Back, and Reject buttons. If you only move one candidate at a time, there are other options are available:
- List View: In the chevron sequence, click the name of the stage to move the Candidate.
- Kanban View: Click the card that represents the Candidate and drag-and-drop the card to the column to move them to that stage.
If you click the name of a stage in list view or the pencil icon on a card in kanban view (excluding Internal Interview and Closing Report), you are given the option to edit the data from when the candidate was first moved to that stage.
Editing Send Out Schedules from here is only allowed for one Candidate at a time if the Interview is scheduled for a future date. If the existing Interview has a date in the past, a blank Send Out Schedule will display and entering data and saving will result in creating a new Send Out Schedule.
Admin Note
It's possible to turn off the ability to move a Candidate back when a user clicks the stage chevron. Users will still have the option of moving Candidates back by using the Move Back button from the Actions Toolbar.
To change this setting, navigate to Setup > Custom Settings > ATS Configuration Settings > Manage Records and select the Disable single move back checkbox.
- The text of the error message that displays when a user tries to move a Candidate back can be customized and translated by editing the following Custom Label: ATS_Move_Back_Single_Stage_Msg.