Job : Job Stages
Overview
Job Stages help you manage and track Candidates as they move through the recruiting process. includes standard Job Stages right out of the box but the stages can also be customized. This article details out your options when using Job Stages. See ATS v2: Customizing Candidate Stages for more information on customizing stages.
Job Stages
These are the standard Job stages included in the package:
- Application: The Candidate has been identified as being suitable for the position.
- Internal Interview: This stage is used to set up an Interview between your 's internal users and Candidates.
- Submittal: The recruiter submits a Candidate to the client. When moving a Candidate to Submittal you're given the option to send an email with the Candidate's resume to the Client.
- Send Out: The Candidate has been selected for an interview with the client. Interview details are entered.
- Offer: The Candidate has received an offer.
- Closing Report: The Candidate has accepted the client offer and agreed to all the terms. The placement of the Candidate is the end of the recruiting process.
In List Views, Job stages are color-coded as follows:
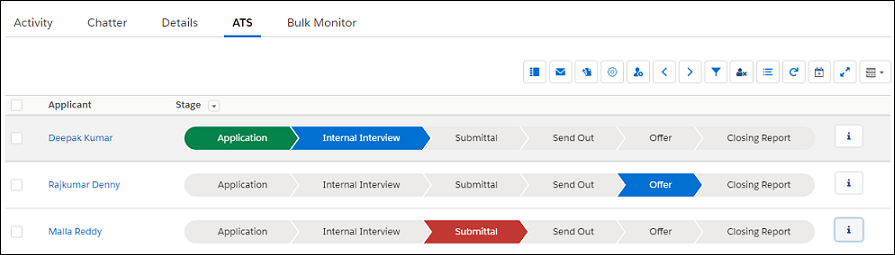
- Blue: The current stage of the Candidate.
- Green: The previous stages.
- Red: The stage in which the Candidate has been rejected.
- Grey: Stages that have been skipped.
- Note that Candidates do not need to go through every stage. They can be entered at any stage and moved to any stage.
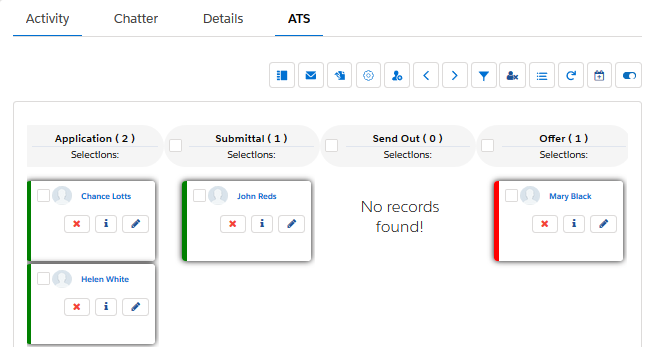
The Kanban View displays a green bar for active Candidates and a red bar for rejected Candidates:
Application
Candidates can be applied to a Job in in several ways:
- Apply from within the : Click the Quick Add
 button to add a Candidate.
 - Apply from Search and Match results: Select some or all Candidates from the search results, and add them to using the Add to Application button.

- Apply from Call Lists: Select Call List Members and click the New Application button.

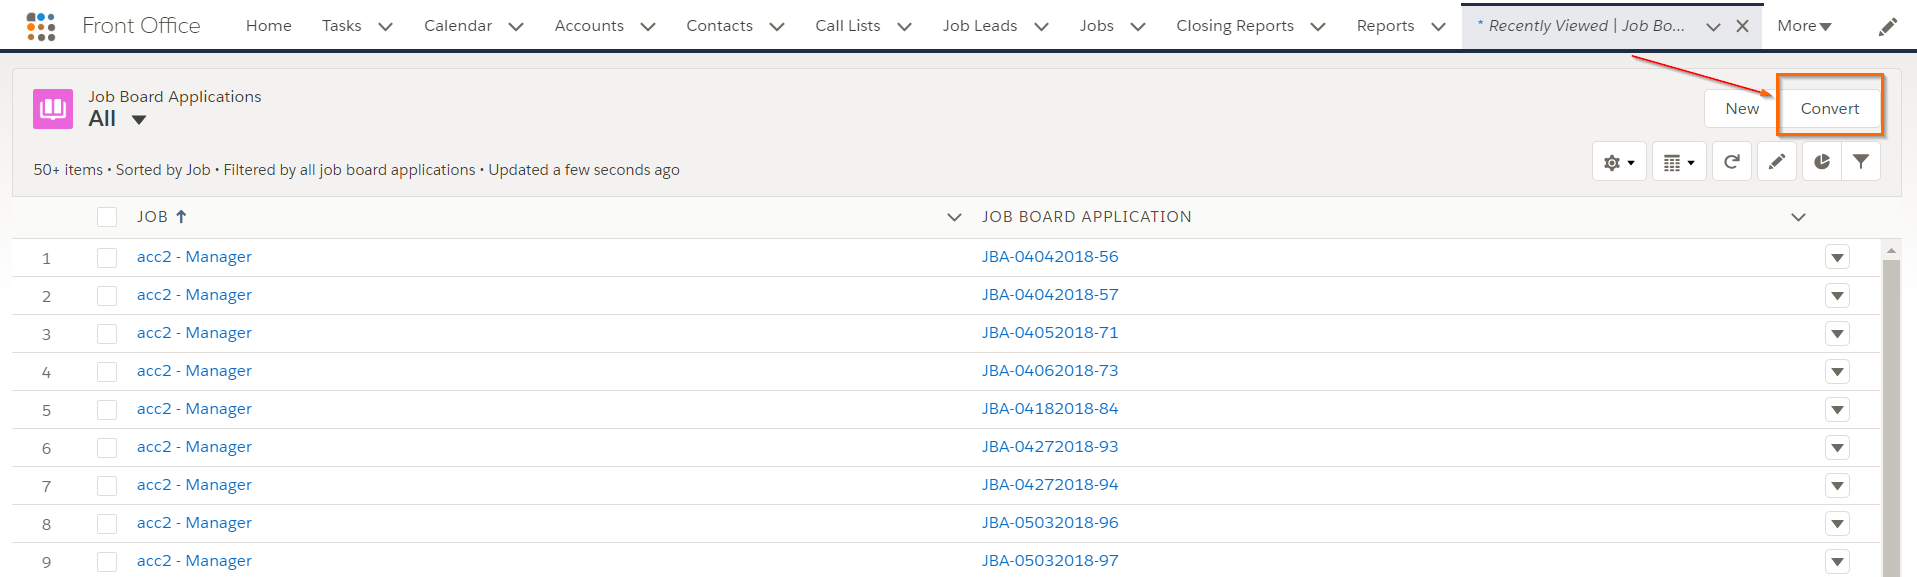
- Convert Job Board Applications: (Only for s with Job Board Applications enabled) Go to the Job Board Applications List View tab, select the Job Board Applications you want to convert to Application, and click the Convert button.
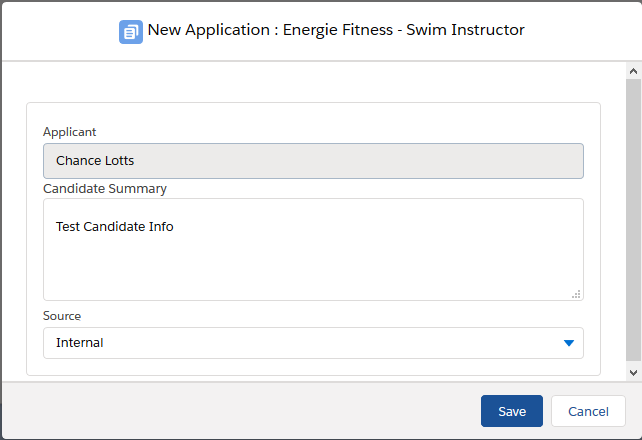
Application Data Entry Page
When a Candidate is added to the Application Stage, you are prompted to enter data related to the Application. The New Application page is driven by a customizable Field Set.
You can add multiple Candidates from the Quick Add Application data entry page, by clicking Add Applicant.
- If multiple Candidates are selected and some of those Candidates are already applied, the data entry page will only consider the Candidates that have not yet been applied to the job.
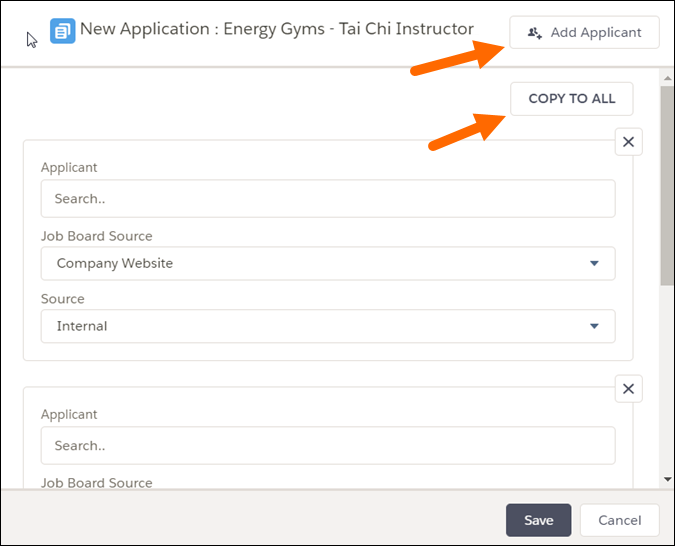
Use the Copy to All button to copy the data entered for the first Candidate into the necessary fields for the rest of the Candidates.
Admin Note:
To select the fields you want to see in on the Application Data Entry page, add or remove fields from the following Field Set:
- Setup > Build > Create > Objects > Application V2 > Field Set:KanbanNewApplications
Ensure that the same fields in the Application Information section appear on the page layout to have the data mapped correctly.
To skip the step of entering data when applying Candidates to a job you can remove all fields from the above Field Set.
Internal Interview
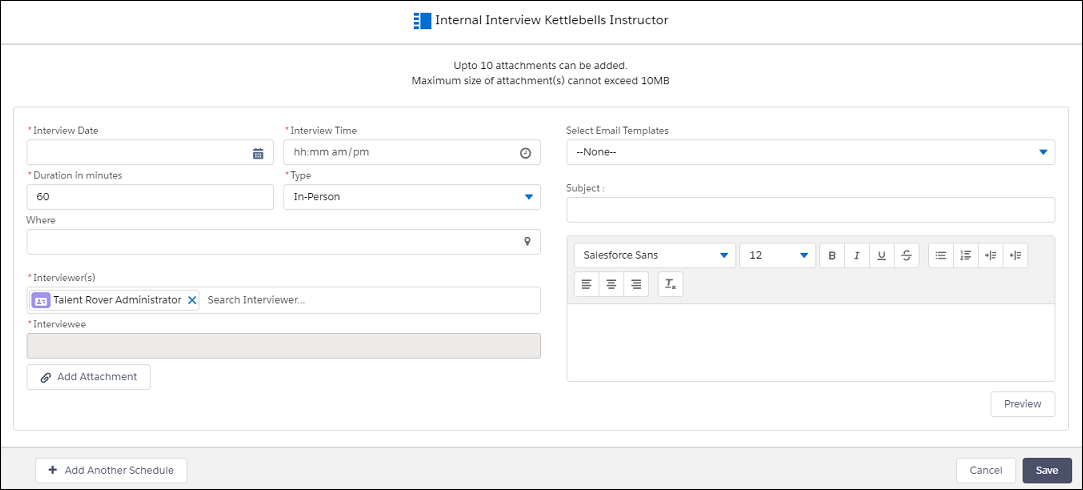
When Candidates are moved to the Internal Interview stage, a pop-up window will display that allows you to set up an interview with the Candidates. Complete the form, add an email, and then click Save.
- This sends an email to the Interviewee and/or Interviewer with the details of the upcoming interview. This email includes the day, time, type, location, and email body, which can be a template or free text.
- An Event record is also created against the Job with a Record Type of Internal Interview. This will result in the Candidate being moved to Internal Interview Stage and the record being updated in the background.
When a Candidate is moved to Internal Interview via the Move Forward button, Move Backward button, or by clicking the stage to move a single record, the Stage picklist on the record is updated to Internal Interview. If the Internal Interview button from the Action Toolbar is used, an Internal Interview is created without changing the stage. This is similar to Send Out Schedule, sending out meeting invites and tracking the activity against the recipients.
Interview Fields
| Interview Date | Select the Interview day using the calendar picker. This is a mandatory field. |
| Interview Time | Select the Interview Time using a drop-down. If the desired time is not listed, you can enter it manually using the following format - hh:dd am/pm. This is a mandatory field. |
| Duration in minutes |
Enter a value for the Interview duration.
|
| Type |
Select a value from the picklist for the Interview Type.
|
| Where | If your has an integration with Google Maps, you're able to see a visualization of the location you have entered by clicking on it. |
| Interviewer(s) | This field will show only users with access or related to the respective Job record. |
| Interviewee | This field is pre-populated with the name of the Candidate selected in the . |
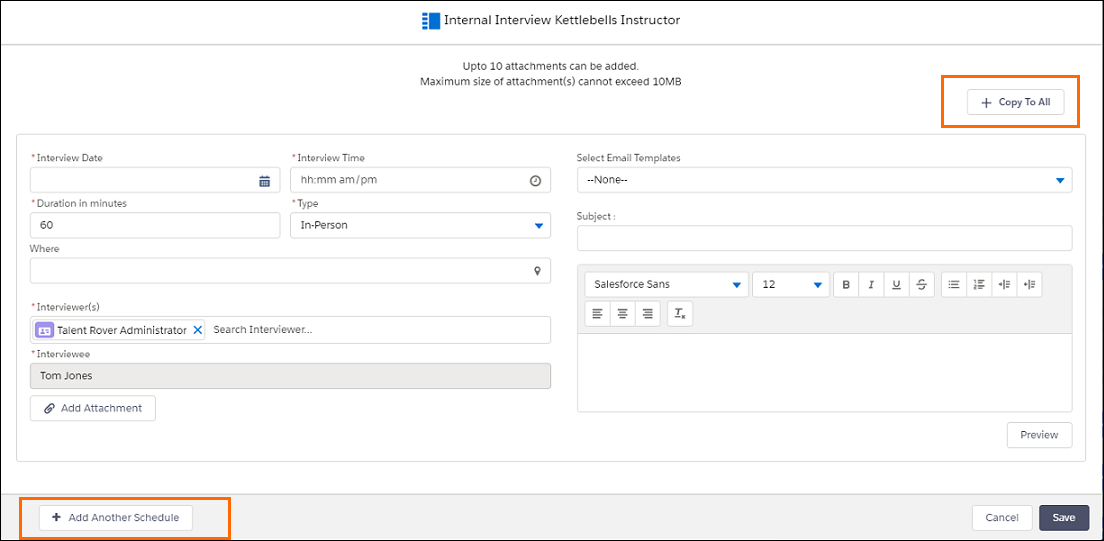
From the Internal Interview page you can also create multiple Interviews and add another schedule.
- Multi-select: If you select multiple Candidates in the and move them to the Internal Interview stage, the pop-up window will contain as many sections as there are selected Candidates. The Copy to All button can be used to copy the field values to all schedules.
- Add Another Schedule: This link is located at the bottom left of the pop-up and allows you to manually add another schedule. This is useful when a Candidate is already in the Internal Interview stage and is sent for a second or third interview.
Admin Note:
The Interview fields can be customized in several ways.
Make certain fields not required:
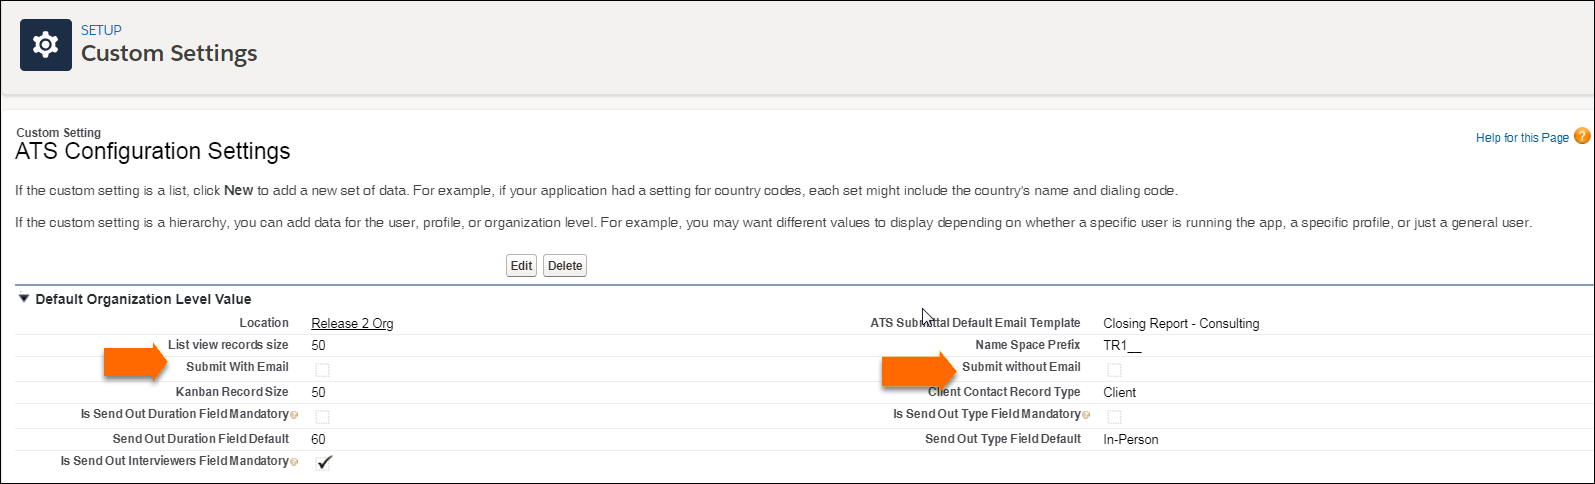
- Go to Setup > Custom Settings > ATS Configuration Settings and deselect the option corresponding to the field you want to change.
- Duration in Minutes: Is Send Out Duration Field Mandatory
- Type: Is Send Out Type Field Mandatory
- Interviewer(s): Is Send Out Interviewers Field Mandatory
Set default values for the Duration In Minutes and Type fields:
- Go to Setup > Custom Settings > ATS Configuration Settings and enter the desired default interview duration time in minutes in Send Out Duration Field Default and enter the desired Interview Type in Send Out Type Field Default.
- The default Type must be one of the options in the Type picklist: Phone, Video, In-Person, or Other.
Interview Emails
Emails are always sent to selected Interviewers and the Interviewee when the Save button is clicked. leverages to send emails from the Send Out Schedule page.
- Templates are supported (text, custom, and HTML types) and you can pick one by using the Select Email Templates drop-down. The logged in user will see all of the templates that are in folders shared with them as long as they are marked as "Available to use".

Only merge fields from the Send Out Schedule V2, Job, and Contact objects will be populated correctly. Click Preview to verify that the email template merge fields are populated correctly. If you select multiple interviewers, the name merge field will only display the name of the first interviewer.
- Text can be entered in the Email Body field if templates are not used.
- Attachments can be uploaded from your computer, or you can select from the list of documents that you own or are shared with you within your .
- The maximum file size per uploaded document is 2 MB and the total attached files size cannot exceed 10 MB. There is a maximum of 10 attachments per Send Out schedule.
- An Event is created against the Job record for every Invitation sent out with a Record Type of Internal Interview.
Submittal
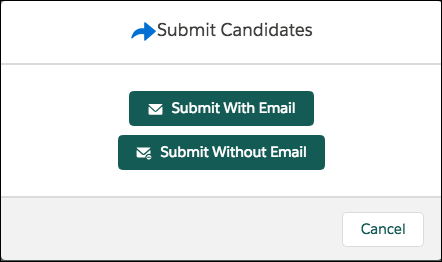
There are two options when you move a Candidate to the Submittal stage:
- Submit with email: Click this to display an email pop-up form where you can enter a message to the employer.
- Submit without email: Click this to move the Candidate to the Submittal stage without sending an email.
Admin Note
It's possible to skip this page and have either Submit With Email or Submit Without Email as the default action when moving a Candidate to the Submittal stage. To accomplish this, follow the below steps:
- Navigate to Setup > Custom Settings > ATS Configuration Settings and check the checkbox for either Submit With Email or Submit without Email.
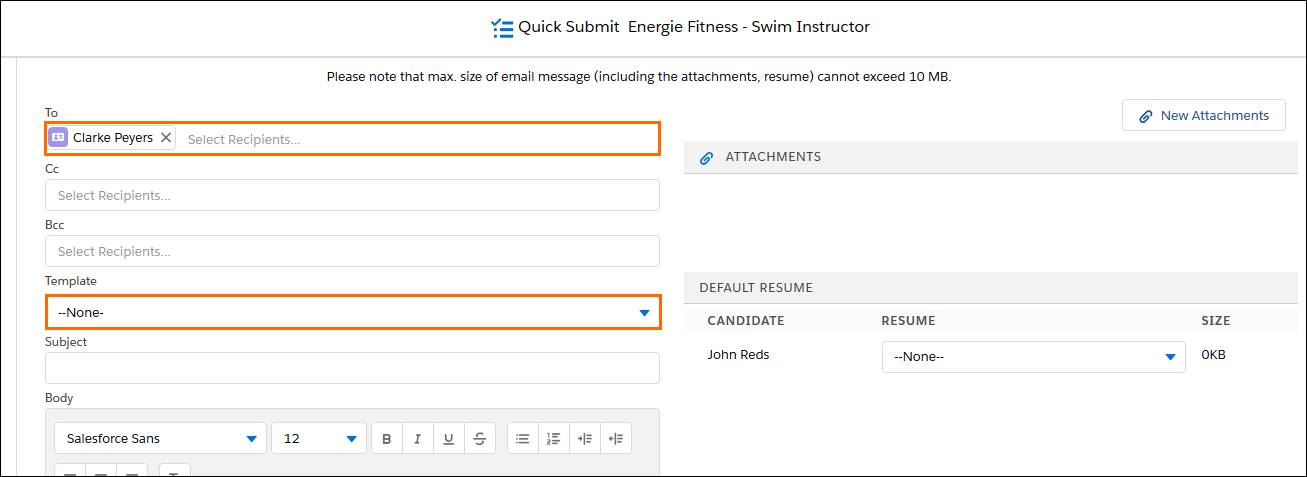
Submit With Email
When Submit With Email is selected, the following features are available:
- Select a Template: You can manually select a template here or a default Submittal template can be set up by the .
- The logged in user will only see
the templates stored in template folders they have access to that are marked as "Available for use".
- The logged in user will only see
the templates stored in template folders they have access to that are marked as "Available for use".
- To: This field is pre-populated with the name and email address of the Client Contact from the Contact field on the Job record.
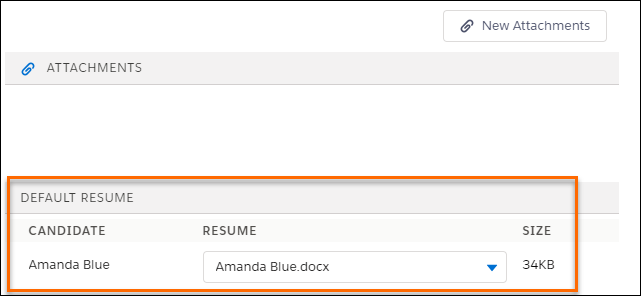
- Default resume: The default resume for the selected Candidates is attached automatically to the Email.
- New Attachments button: When you click the New Attachments button, a Select Files page will open and allow you to attach your own files, or those that are shared with you or stored locally.

The maximum size of email messages, including attachments and resumes, can not exceed 10 MB. The file size using the Upload Files button can not exceed 2 MB.
Admin Note:
To set up a default template, follow the step below:
- Go to Setup > Custom Settings > ATS Configuration Settings and enter the Email Template Name in the ATS Submittal Default Email Template field.
It is also possible to filter the Contacts that display in the to, cc, and bcc fields. See ATS v2: Lookup Filtering for more information.
Send Out
When Candidates are moved to the Send Out stage, a pop-up window will display that allows you to set up an interview (Send Out Schedule) with the Candidate. Complete the form, add your email, and then click Send.
- This sends an email to the Interviewee and/or Interviewer with the details of the upcoming interview. This email includes the day, time, type, location, and email body, which can be a template or free text.
- An Event record is also created against the Job with a record type of External Interview.
You can also choose to enter data without sending an interview invite. This will still result in the Candidate being moved to the Send Out stage and will update the record in the background.
Send Out Schedule Fields
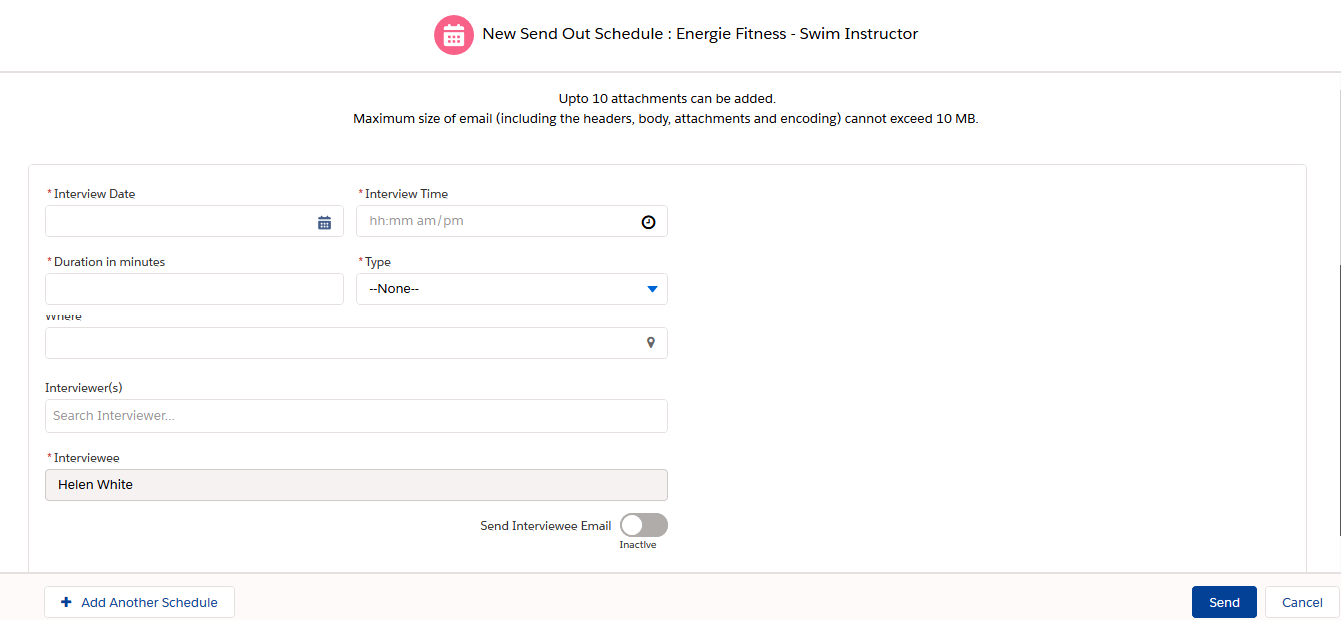
| Interview Date | Select the Interview day using the calendar picker. This is a mandatory field. |
| Interview Time | Select the Interview Time using a drop-down. If the desired time is not listed, you can enter it manually using the following format - hh:dd am/pm. This is a mandatory field. |
| Duration in minutes |
Enter a value for the Interview duration.
|
| Type |
Select a value from the picklist for the Interview Type.
|
| Where | If your has an integration with Google Maps, you're able to see a visualization of the location you have entered by clicking on it. |
| Interviewer(s) | This field will show only users with access or related to the respective Job record. |
| Interviewee | This field is pre-populated with the name of the Candidate selected in the . |
From the Send Out Schedule page, you can also create multiple Send Outs and add another Schedule.
- Multi-select: If you select multiple Candidates in the and move them to the Send Out stage, the pop-up window will contain a section for each selected Candidate. The Copy to All button can be used to copy the field values to all schedules, except for the Interview Date, Interview Time, and Interviewee Attachment.
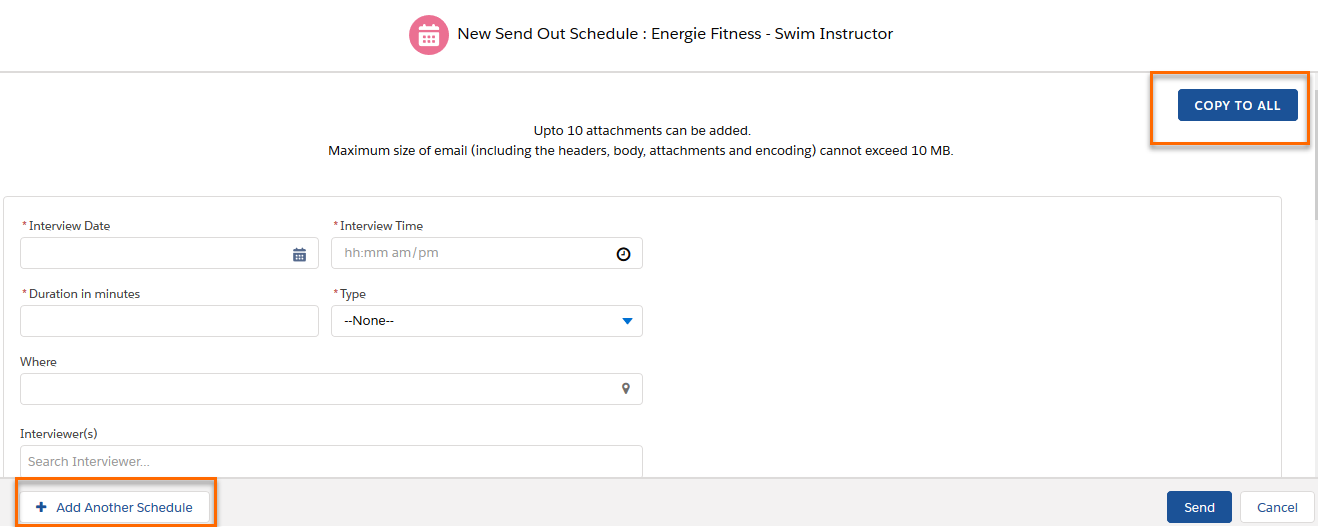
- Add Another Schedule: This link at the bottom left of the pop-up allows you to manually add another Schedule. This is useful when a Candidate is already in the Send Out stage and is sent for a second or third interview.
 Ensure that you do not edit the existing Send Out Schedule when a subsequent Interview is needed, use the Add Another Schedule button instead. In the background, a new Send Out Schedule record will be created along with a new email sent and new Events created against the Job and Contacts. This will signify that this is the subsequent interview for that Candidate.
To view all, edit, or cancel Send Out Schedules use the View Interview Schedules button on the Action Toolbar. See Job ATS v2: Actions Toolbar for more information.
Interviews are also Canceled when a Candidate in the Send Out Schedule stage is rejected or moved back. Send Out Schedules can be edited in List View by clicking the name of the current stage and in the Kanban View by clicking the pencil icon on the card.
Admin Note:
The Send Out Schedule fields can be customized in several ways.
Make certain fields not required:
- Go to Setup > Custom Settings > ATS Configuration Settings and deselect the option corresponding to the field you want to change.
- Duration in Minutes: Is Send Out Duration Field Mandatory
- Type: Is Send Out Type Field Mandatory
- Interviewer(s): Is Send Out Interviewers Field Mandatory
Set default values for the Duration In Minutes and Type fields:
- Go to Setup > Custom Settings > ATS Configuration Settings and enter the desired default interview duration time in minutes in Send Out Duration Field Default and enter the desired Interview Type in Send Out Type Field Default.
- The default Type must be one of the options in the Type picklist: Phone, Video, In-Person, or Other.
Create a New Contact from the Interviewer Field
- It's possible to filter the Contacts that display in the Interviewer(s) field. See ATS v2: Lookup Filtering for more information.
- Users have the option of creating a new Contact from this look up field as long as the Interviewer is not already in .
- If your uses Contact Record Types, set a default Record Type for when a new Contact is created. To do this, go to Setup > Custom Settings > ATS Configuration Settings and enter the desired name of the Record Type in Client Contact Record Type.
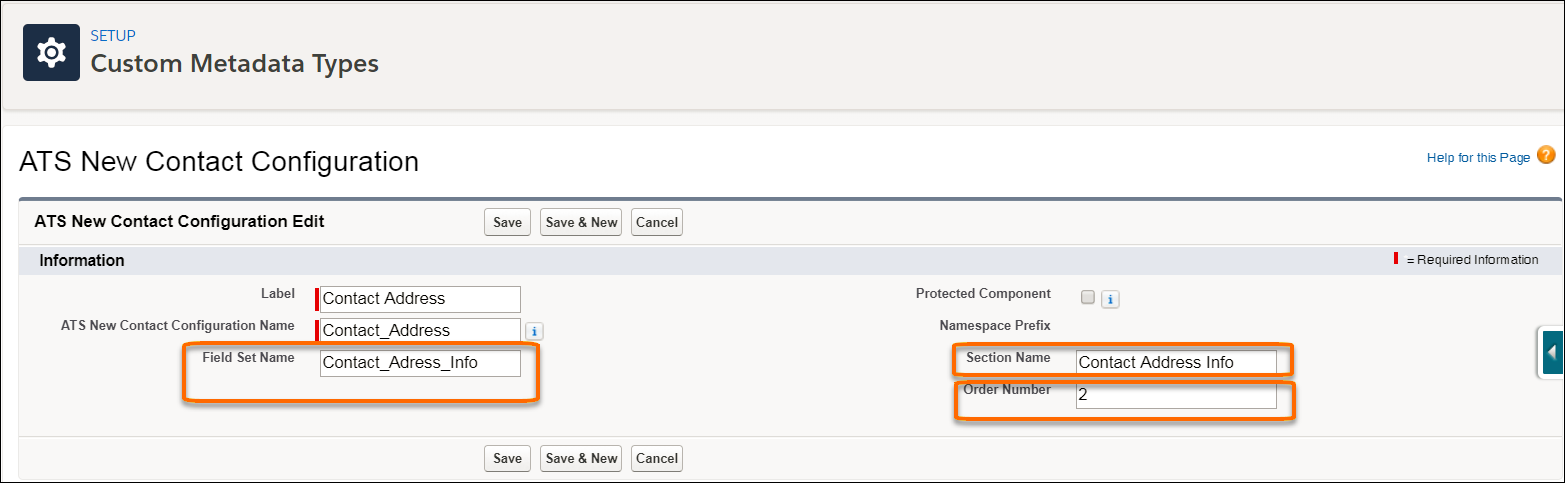
- The New Contact pop up can be customized:
- Go to Setup > Custom Metadata Types > ATS New Contact Configuration.
- Create a Custom Metadata Type record for each section to add to the pop-up (e.g. Contact Details, Address Info, etc.). The fields that appear in each section are controlled by a Field Set so you must specify the name of the Field Set. Finally, if you are creating more than one section, enter a value in Order Number so the sections are displayed in the correct order.
Send Out Schedule Emails
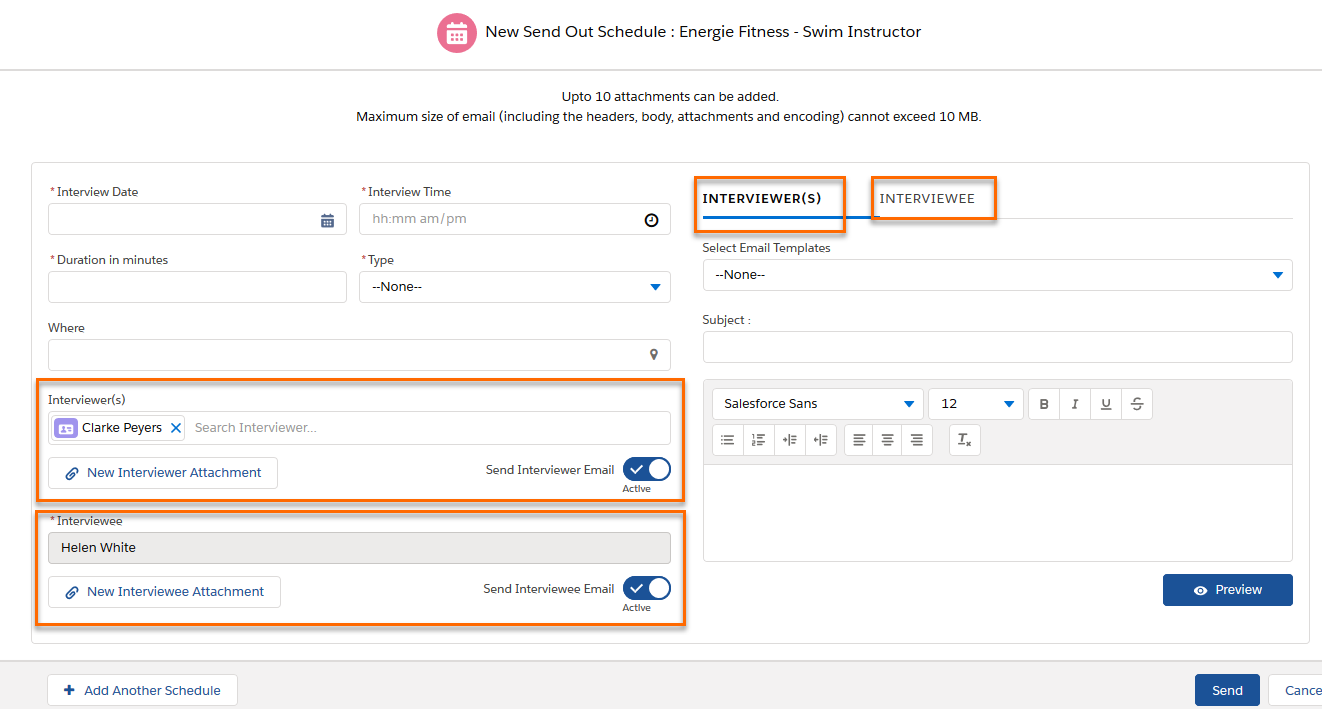
The Send Interviewer Email and Send Interviewee Email toggles are off by default. To activate them, click the toggle. The Interviewee field will be pre-populated but you'll need to select an Interviewer from the dropdown.
Clicking either toggle results in a sub-tab appearing on the right side, one for each toggle that was enabled. This is where you compose your emails for the Interviewers and Interviewee. When the toggles are switched to be active, the New Interviewer Attachment and New Interviewee Attachment buttons are also displayed. leverages to send emails from the Send Out Schedule page.
- Templates are supported (text, custom, and HTML types) and you can pick one by using the Select Email Templates drop-down. The logged in user will see all of the templates that are in folders shared with them as long as they are marked as "Available to use".
Only merge fields from the Send Out Schedule V2, Job, and Contact objects will be populated correctly. Click Preview to verify that the email template merge fields are populated correctly. If you select multiple interviewers, the name merge field will only display the name of the first interviewer.
- Text can be entered in the Email Body field if templates are not used.
- Attachments can be uploaded from your computer, or you can select from the list of documents that you own or are shared with you within your by clicking the New Interviewer/Interviewee Attachment buttons.
- The maximum file size per uploaded document is 2 MB and the total attached files size cannot exceed 10 MB. There is a maximum of 10 attachments per Send Out schedule.
- An Event is created against the Job record for every Invitation sent out with a Record Type of External Interview.
Offer
When you are ready to offer the Candidate the position, move them to the Offer stage by clicking the Offer chevron in the List View. In the Kanban View, drag the Candidate card to the Offer column. You can also select multiple Candidates and move them all to the Offer stage by using the Actions Toolbar.
Offer Data Entry Page
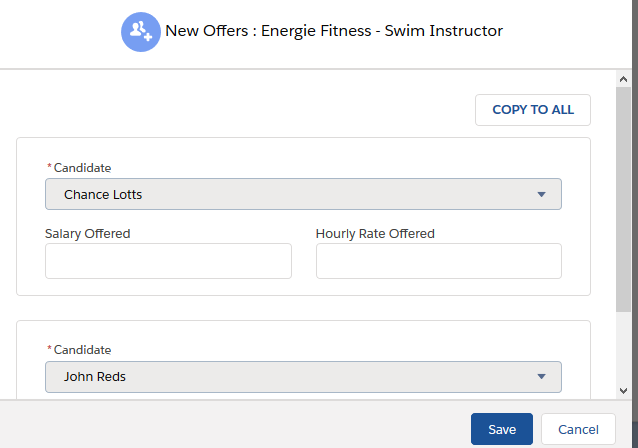
When a Candidate is moved to the Offer stage, you are prompted to enter details about the Job offer.

If you are moving multiple Candidates to the Offer stage, the Offer data entry page will have a section for each selected Candidate. The Copy to All button is available to enter the same values for all Candidates:
Admin Note
To select the fields you want to see on the Offer data entry page, add and remove fields from the following Field Set:
- Setup > Build > Create > Objects > Application V2 > Field Sets: Application New Offer page
Make sure to have the same fields in the Offer Information section on the page layout so the data is mapped correctly.
You can also opt to skip the data entry step by removing all fields from the Field Set.
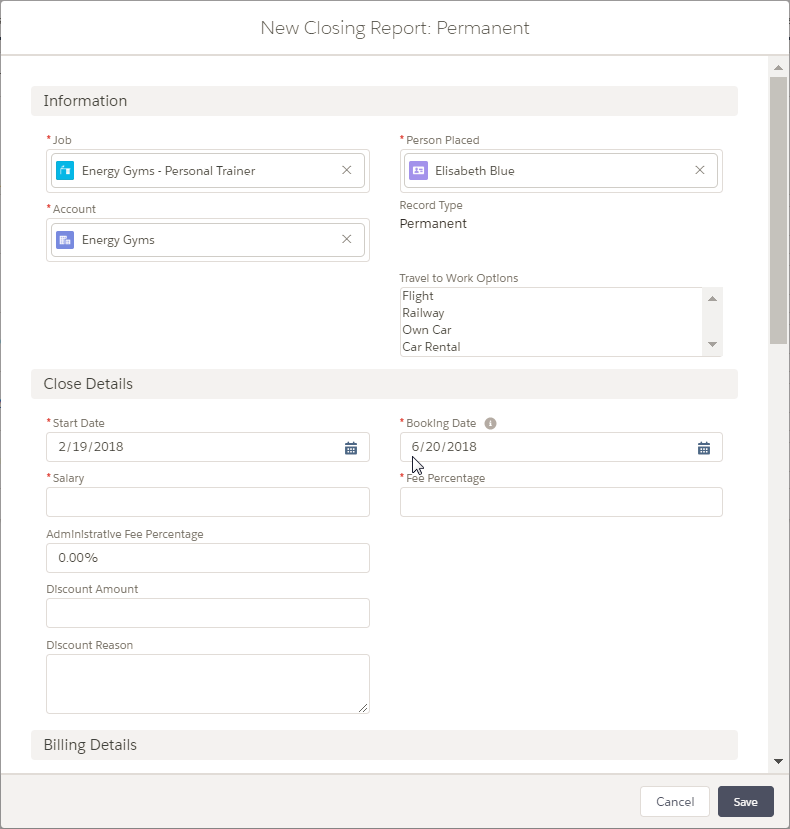
Closing Report
When a Candidate is moved to the Closing Report stage, the standard Closing Report edit page pops up to gather details about the placement. The Record Type will match the job - if it’s a Permanent Job, then it will use the Permanent Closing Report page layout. Only one Candidate at a time can be moved to this stage due to the amount of data required for populating a Closing Report. An alternative is offered for placing multiple Candidates at the same time. See ATS v2 Mass Placements for more information.
The following actions are not possible for Candidates in the Closing Report stage: Move back, Move forward, Reject/Unreject.
Admin Note:
There is an option to configure which fields on the Closing Report edit page will be pre-populated with the values taken from the corresponding Job fields. This configuration will apply to Closing Reports created in the and in Mass Placement.
Go to Setup > Custom Metadata Types > Closing Report Mapping > Manage Records and click New. Create a Custom Metadata Type record for each field you want pre-populated by entering both the API name of the Closing Report field and the API name of the corresponding Job field.

- Out of the box, mapping is included for the following fields. If users don’t want these pre-populated, the values can be removed from the Custom Metadata Type records.
- Bill Rate, End Date, Job Percentage, Pay Rate, and Start Date.
- The following field types are not supported: Rollup-summary, Geolocation, Formula, and Auto Number.
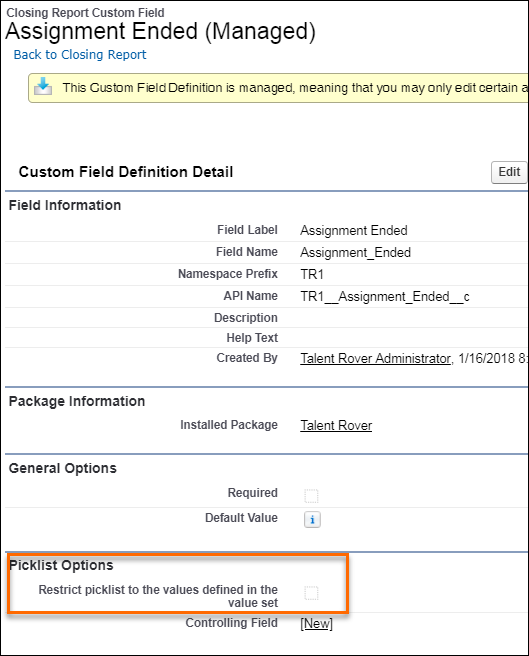
- Picklist and Multi-picklist fields are supported, but please be aware of the following:
- If Restrict Picklist to the values defined in the value set is True, both mapped picklist field values should be same. If not, you will receive an error when saving.
- If Restrict Picklist to the values defined in the values is False, even if the picklist values are different, the Closing Report will be saved with the Job picklist value.
- There will be a conflict if a user maps an unmanaged field with the same API Name as an existing managed package field.