Candidate Rank Group
Overview
This article covers how a Candidate Rank Group works as well as how to configure it. In the early phases of the search process, researchers often work with a long list of potential candidates. Classifying candidates into rank groups is a way to facilitate conversations internally and with the Client.
See ATS v2: Candidate Rank Group User Guide for additional information on using Rank Groups.
The topics in this article are as follows:
Candidate Rank Group Functionality
The Candidate rank group feature can be added to for Jobs.
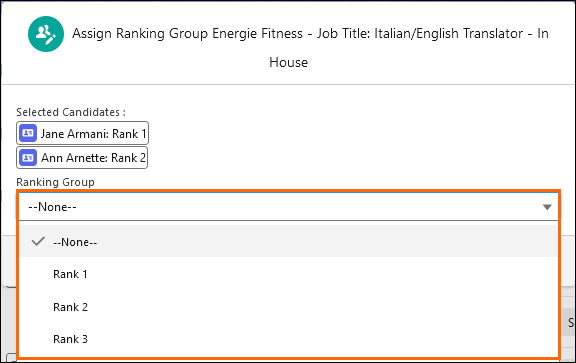
The Ranking Group picklist field on the Application v2 object has the rank group values. There are five values, Rank 1 to Rank 5. These values can be configured, as desired.
Assignment
- Select the Candidate(s).
- Click the Assign Ranking Group in ATS Actions drop-down.
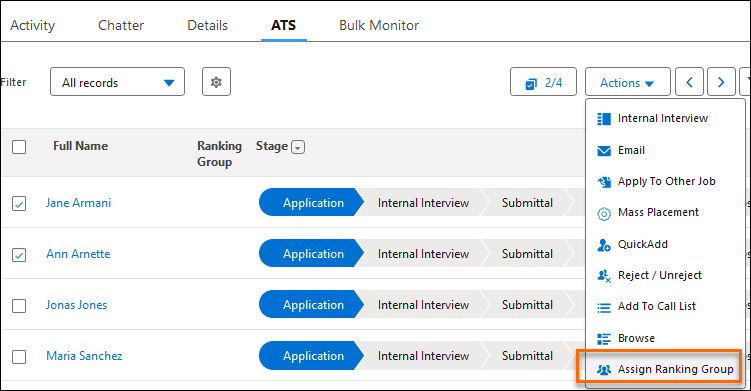
- A pop-up opens that allows users to enter the relevant Rank Group for the selected Candidates.
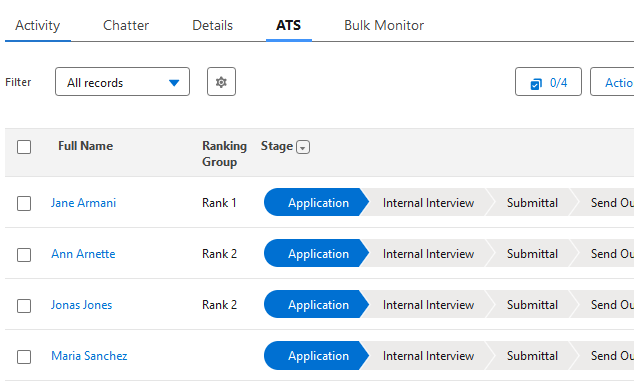
- The selected Rank Group is displayed under the Rank Group column in and Table View in addition to directly on the Candidate’s card in the Kanban View.
Remove Assignment
- Select the Candidate(s).
- Open the Assign Ranking Group modal.
- In the Ranking Group drop-down, select None.
Configuration
The Candidate Rank Group feature is configurable by Job Record Type.
Permission Sets
Assign the Ranking Group and Permission Sets to the users who will use Ranking Groups.
Activate Ranking Group Actions
- Navigate to Custom Metadata Types > ATS Action Configuration.
- Click Manage.
-
Open each of the following records and click the Active checkbox:
- Assign Ranking Group Consulting
- Assign Ranking Group Fixed
- Assign Ranking Group Permanent
- Assign Ranking Group Retained

By default, the field UI Limit on these records is populated with "3". Update to the preferred value depending on the threshold you want to set for bulk assignment of the ranking group value.
Ranking Group Picklist
- In Object Manager, go to the Application V2 object.
- Select the Record Types tab.
- Click on the appropriate record type.
- In the Picklists Available for Editing section, find Ranking Group and click Edit.
- Select the appropriate values.
- Click Save.
- Repeat for each relevant record type.
Create Connected App
This part can be skipped if you have already configured UI API Connected App for other functionalities. For example, Power Notes.
Ranking Group needs access to the Metadata API for proper functionality, so a Connected App and Named Credentials with the appropriate access are needed.
Set Up
- Navigate to Setup > Lightning Experience App Manager.
- Click on New Connected App.
- Populate the fields as follows:
- Connected App Name: UI API Connected App
- API Name: UI_API_Connected_App
- Contact Email: Admin email
- Enable OAuth Settings: Checked
- Callback URL: {your_domain}/services/authcallback/UI_API_Auth
- For example, https://customer-flow-4368-dev-ed.my.salesforce.com/services/authcallback/UI_API_Auth
- To find the proper domain name, open the Developer Console and copy the domain name from the address bar.
- Selected OAuth Scopes: Full access (full), Perform requests at any time (refresh_token, offline_access)
- Require Secret for Web Server Flow: Selected
- Require Secret for Refresh Token Flow: Selected
Create Authorization Providers Record
- Navigate to Setup > Identity > Authorization Providers.
- Click New.
- Populate the fields as follows:
- Provider Type: Salesforce
- Name: UI API Auth
- URL Suffix: UI_API_Auth
- Consumer Key: Copy from the UI API Connected App
- This can be found by navigating to the below:
- App Manager > UI API Connected App > View > Manage Consumer Details.
- This can be found by navigating to the below:
- Consumer Secret: Copy from UI API Connected App
- Default Scopes: Full refresh_token offline_access
- Include Consumer Secret in API Responses: Selected
- To the to views, add the Ranking Group field.
Create Named Credential
- Navigate to Setup > Security > Named Credentials.
- Select New , then click New Legacy.
- Populate the fields as follows:
- Label: UI API Creds
- Name: UI_API_Creds
- URL: {your_domain}
- To find the proper domain name, open Developer Console and copy the domain name from the address bar.
- Identity Type: Named Principal
- Authentication Protocol: OAuth 2.0
- Authentication Provider: UI API Auth
- Scope: Full refresh_token offline_access
- Start Authentication Flow on Save: Selected
- Generate Authorization Header: Selected
- Allow Merge Fields in HTTP Body: Selected
- Click Save.
- You are redirected to the log in page. Input your credentials.
- Allow access to the requested source.
- If you receive any errors, wait 5-10 minutes. The Authentication process can fail because the Connected App creation takes 10 minutes.
Add Ranking Group Field
Table View
- Navigate to ATS Config per Job Record Type > Custom Metadata Types.
- Click Edit.
- Click Edit next to the Fields to Display field.
- Add toLabel(TR1__Ranking_Group__c).
From the Application V2 object, move the Ranking Group field to the form on the TR1__Lightning_List_Tab Fieldset.
Kanban View
From the Application V2 object, move the Ranking Group field to the form on the TR1__KanbanCardLineFieldSet Fieldset.
Create Bulk Action Definitions
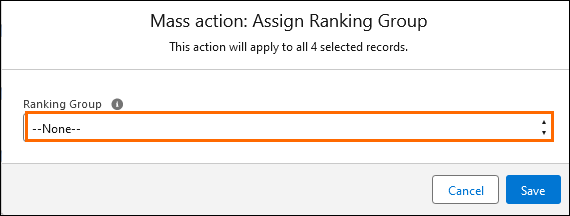
Configuring the Mass/Bulk Rank Group assignment means that if the number of Candidates selected exceeds the set limit, the action is performed as a mass/bulk action. A pop-up will ask you what ranking you would like to set for the selected Candidates to fall.
To configure this, open the Developer Console and create a Bulk Action Definition record with Name Assign Ranking Group by calling the following:
TR1.BulkActionDefinitionUtility.createDefinitions();OPTIONAL: Display Candidate Rankings Group as Icon
You may display Ranking Group icons instead of text.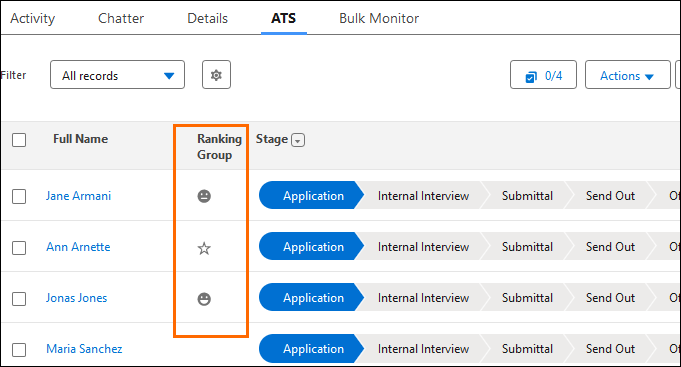
- Navigate to Setup > Custom Settings > ATS Configuration Settings.
- Click Enable Icons For Ranking Groups.
- Navigate to Setup > Custom Metadata Types > Ranking Group Icon Setting.
- Create a record for each ranking group for any of the desired available fields.
Available Field: Ranking Group API Name
The API Name of Ranking Group field defines the value for the icon.
Available Field: Icon Name
This is the Salesforce icon name that displays on Job ATS. For example, the icons that appear here Icons - Lightning Design System.
When you enter the Icon Name, follow this format:
- sectionName:icon name
- This is the name of the Icon Type.
- name:icon name
- utility:icon name
- doctype:icon name
- standard:icon name
- custom:icon name
- action:icon name
For example, if you wanted to use the football as an icon, you would enter "utility:activity" and it would display the below: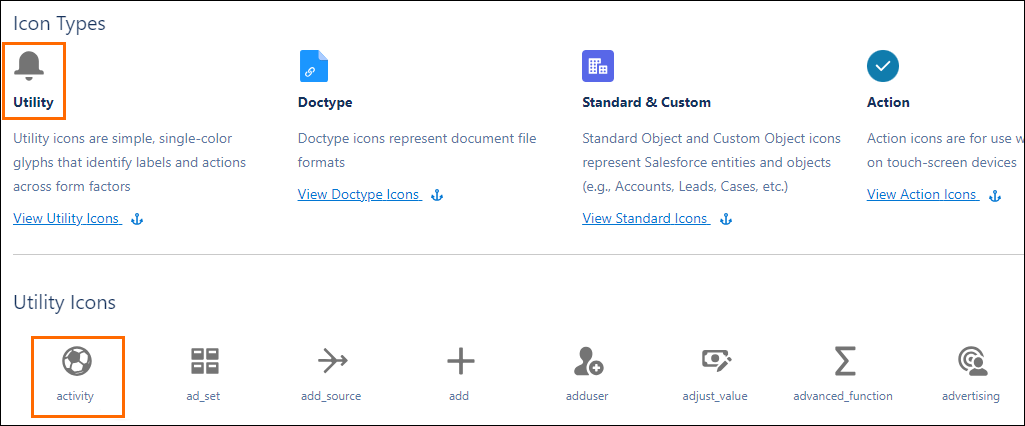
Available Field: Alternative Text
In the case no icon is found, this alternative text will be displayed.