| Package: Recruiting(JS2) |
Creating an Assignment
![]()
-
Navigate to Assignments.
You will see a screen that looks something like this.
-
Go to New Assignment.
-
From the Record Type of new record list, select one of the following values.
Note: All of the following record types may not be available based on the Administrators preferences during the implementation process.Record Type Name
Description
Closed
Closed Assignments
Perm
Job for a permanent requirement.
-
Continue to display the Assignment Edit screen.
The Assignment Details panel describes the job.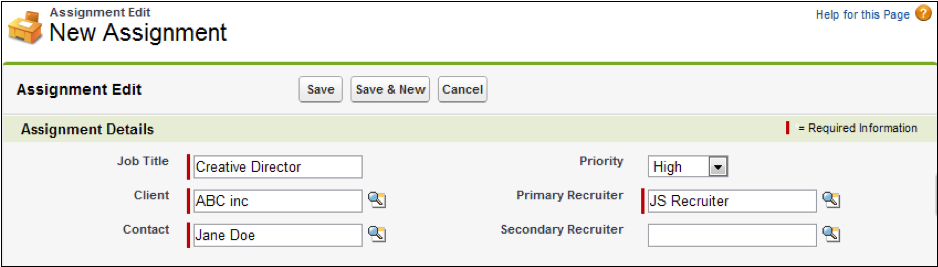
-
Double-click the Title field to display a list of previously defined job titles. You may select from this list or enter a new value.
-
Enter a value in the Client field or click
 to open a search dialog and to select a user name.
 -
Enter a value in the Contact field or click
to open a search dialog and to select a user name. -
Optionally, select a value from the Priority drop-down list. The possible values are:
-
High
-
Medium
-
Low
-
-
Enter a value in the Primary Recruiter field or click
to open a search dialog and to select a user name. -
Optionally
-
Enter a value in the Secondary Recruiter field or click
to open a search dialog and to select a user name.The Comp Details panel describes the job's compensation.

-
Enter a number into the Min Salary field. This is the minimum that the candidate might receive.
-
Enter a number into the Max Salary field. This is the maximum that the candidate might receive.
-
Choose an Estimated Start Date by:
-
Clicking the box to display a calendar and select any date.
-
Clicking the date link at right to insert today's date into the field.
-
-
Enter a number into the Min Bill Rate field. This is the minimum that the client will pay.
-
Enter a number into the Max Bill Rate field. This is the maximum that the client will pay.
-
Enter a number into the Fee Pct field.
-
Enter a number into the Close Pct field.
Note: The Close Pct is the likelihood that the job will be filled. This helps calculate the Forecasted Revenue field. It is up to the your discretion how to determine the percentage.
The Status Details panel describes the job status.

-
Pick a value from the Status drop-down list. The possible values are:
-
Open
-
Hold
-
Closed
-
-
-
Set an Expected Close Date by:
-
Clicking the box to display a calendar and select any date.
-
Clicking the date link at right to insert today's date into the field.
-
-
Optionally, select a Date Closed by:
-
Clicking the box to display a calendar and select any date.
-
Clicking the date link at right to insert today's date into the field.
-
-
If the Assignment was closed, optionally select a Closed Reason. The possible values are:
Note: Jobscience Executive Edition comes with an Active validation rule that requires the user to enter a Closed Reason value when the Status is changed to 'Closed'. This rule can be deactivated by the system administrator.
The Job Description panel describes the job.
-
--None--
-
Won
-
Lost - Filled by Competitor
-
Lost - Filled by Client
-
Cancelled - By Recruiter
-
Cancelled - By Client
-
Other
-
-
Pick a value from the Location drop-down list. This list will have been customized to your requirements.
-
Select a value from the Department drop-down list. This list will have been customized to your requirements.
-
Optionally, enter a description into the Job Advertisement field.
-
Finish
-
Save to create the new Assignment.
The completed Assignment appears on the screen. -
Save & New to create the new Assignment and to begin creating another Assignment.
The Select Assignment Record Type screen appears again. -
Cancel to discard your inputs.
-