| Package: Recruiting(JS2) |
Job Orders Overview
![]()
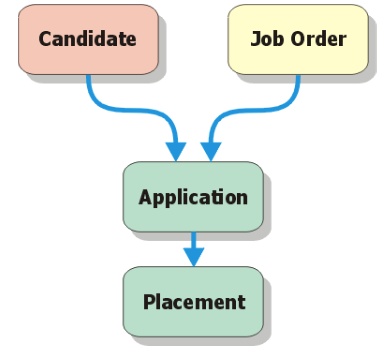
Creating Job Orders
There are multiple ways to create a Job Order.
From the Job Orders Tab
-
Select and display the Job Orders tab.
You will see a screen that looks something like this.
-
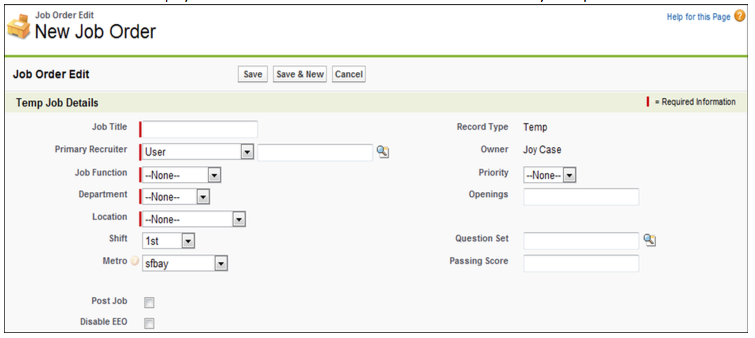
Click New Job Order to display the New Job Order screen.
-
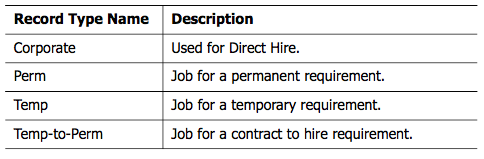
From the Record Type of new record list, select one of the following values.
Note: All of the following record types may not be available based on the Administrators preferences during the implementation process.
-
Click Continue to display the Job Order Edit screen or click Cancel to discard your inputs.
Viewing Job Orders
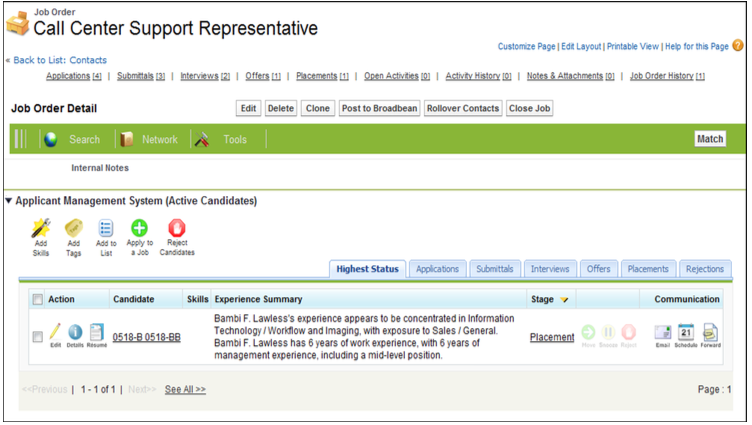
From the Job Orders screen, click the Job Title link in the List View.

The Job Order screen appears.
Editing Job Orders
After displaying the Job Order screen for any Job Order, click Edit to modify its contents. The Job Order Edit screen appears.
-
Make any necessary changes.
-
Finish
- Click Save to create the record and return to the Job Order screen.
- Click Save & New to create the record and display a new Select Job Order Record Type screen.
- Click Cancel to discard your inputs and return to the Job Order screen.
Deleting Job Orders
Job Order Detail View
After displaying the Job Order screen for any Job Order:
-
Click Delete to delete this Job Order.
-
Click OK when the Are you sure? dialog appears.
Job Orders List View
After displaying the Job Orders screen:
-
Click Del next to any entry in the Job Orders List View.
-
Click OK when the Are you sure? dialog appears.
Note: When deleting Job Orders, you also delete any associating Application records as well, including Placements.
Cloning Job Orders
After displaying the Job Order screen for any Job Order:
-
Click Clone to duplicate the record.
The Job Order Edit screen appears. -
Make any necessary changes.
-
Finish:
-
Click Save to create the record and return to the Job Order screen.
-
Click Save & New to create the record and display a new Select Job Order Record Type screen.
-
Click Cancel to discard your inputs and return to the Job Order screen.
-
Transferring Job Orders
After displaying the Job Orders screen:
-
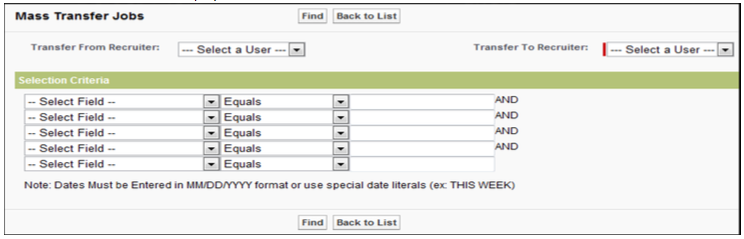
Click Transfer Jobs to display the Mass Transfer Jobs screen.
-
Optionally, to filter the Job Orders, make a selection in the Transfer From Recruiter drop-down list.
-
This is a list of users who are listed in the Primary Recruiter of at least one Job Order.
-
A value in this field will produce a list of Job Orders owned by that owner or, if left NULL, All Job Orders.
-
-
Make a selection in the Transfer To Recruiter drop-down list.
-
This is a list of all Active users in the system who do not have a Salesforce Portal License type.
-
Optionally, add selection criteria to further filter the Job Orders.
-
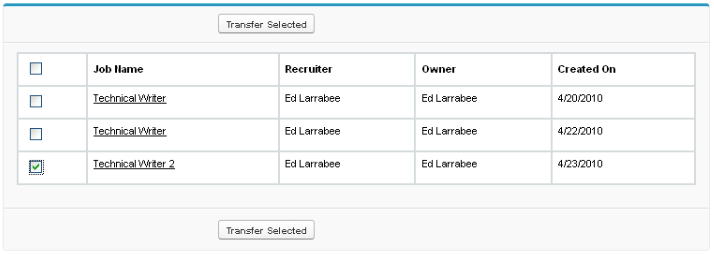
Click Find to produce a list of Job Orders.
-
Place a checkmark to the left of the Job Orders you wish to transfer.
-
Clear the checkmarks to the left of the Job Orders you wish to keep.
-
Click Transfer Selected. The Mass Transfer Jobs screen reappears.
Note: All previously listed Job Orders will be selected again.
Using Selection Criteria
To filter the list of Job Orders that you see:
-
Select a Job Order field from the left-most drop-down list.
-
Select a comparison operator from the middle drop-down list
-
Enter a comparison value into the right-most field.
Note: Dates Must be Entered in MM/DD/YYYY format or use special date literals - Example: THIS WEEK.
-
Optionally, repeat steps 1 through 3 to add additional filtering criteria to further narrow the results list.
-
Click Find.
All matching Job Order records will appear below.
Managing Activities
After displaying a Job Order screen:
-
Scroll down to the Open Activities panel.

-
Optionally
-
Click New Task to display the New Task screen.
-
Add a new event to your calendar.
Click New Event to display the New Event screen.
-
-
Click Edit to the left of an Activity to change its details.
-
Click Cls next to an Activity to close it.
Adding Notes and Attachments
Notes and Attachments allow you to associate unstructured information, such as written comments and file attachments, to the Job Order.
After displaying a Job Order screen:
-
Scroll down to the Notes & Attachments panel.

-
Optionally
-
Add a Note to the Job Order.
Click New Note to display the Note Edit screen.
-
Select Private if the Note is not to be shared.
-
-
Enter a Title for the Note.
-
Enter the contents of the Note into the Body field.
-
Optionally
- Click Save to save the Note.
- The new record appears on the Job Order screen.
-
Click Cancel to discard your inputs.
-
Add a file attachment to the Job Order.
Click Attach File to display the Attach File screen.-
Click Browse... to navigate to the file on your computer.
-
Click Attach File to read the file data.
-
Repeat steps a and b to attach multiple files.
-
Click Done to return to the Job Order screen.
-
Closing Job Orders
| Note: In order to use the Close Job feature, the Enable Close Job Order Wizard option must be enabled. For help with configuring this option, please contact your system administrator. |
The Close Job feature allows you to disposition/reject all open applications for a specific Job Order. An application is considered open if the Overall Stage is submittal, interview, or offer, and the Overall Status is something other than Accepted or Rejected.
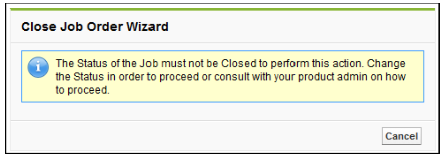
The Close Job Mass Disposition option must be enabled for the Close Job feature to work. If this option is disabled, you must manually disposition/reject all applications that are in a submittal, interview, or offer stage. All applications that are in an application or placement stage are ignored. You need to do this before you perform the Close Job function in order for it to work properly. If you try to close a Job Order with a status of Closed, the following message is displayed.
| Note: Closing a job and unposting a job are not the same. When you close a job, it is because you have hired someone for the position, the job has been put on hold, or you have decided not to hire anyone for the position. When you unpost a job, it is because you have already received enough Candidates and want to look through them, or for some other temporary reason. The job is not going away for good. |
Closing a Specific Job Order
-
From the Job Order screen, click Close Job.
-
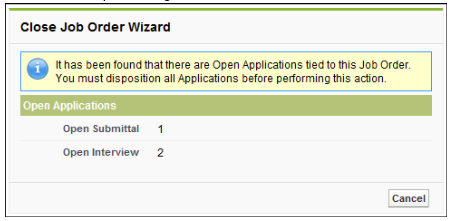
The system checks to see if there are any open applications tied to this Job Order.
-
If open applications are found, the following dialog box appears.
-
Click Cancel and then disposition/reject all open applications before performing the Close Job function.
-
-
If no open applications are found, the following dialog box appears.
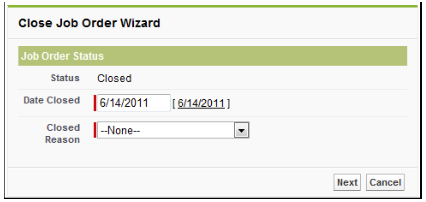
-
The Date Closed field is prefilled with today's date.
If you would like to change it to another date, type it in this field. This field is required. -
Select a Closed Reason from the drop-down list.
The selected reason will be tied to all listed open applications in the Job Order.
This field is required.Note: If you do not want the closed reason tied to all open applications, the Close Job Mass Disposition option must be disabled. You can then manually assign a closed reason to each individual open application. For help with configuring this option, please contact your system administrator. -
Click Next.
-
If the Job Order was successfully closed, the selected Candidates are dispositioned/rejected
-
If the Job Order was posted, it is unposted; and the following dialog box appears.
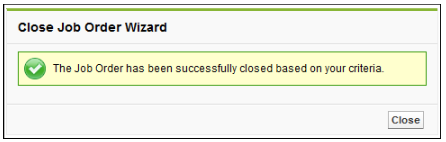
-
-
Click Close to close the Close Job Order Wizard.
Viewing Job Order Histories
After displaying a Job Order screen, scroll down to the Job Order History panel. The system administrator can set up to 20 fields to the History Tracking. When any of those fields are changed, a log is added to the Job Order history showing the before and after contents of the field, who changed it, and when.