| Package: TimeCards |
Timesheet Edit Functions
![]()
Overview
Specific Administrative users can be given timesheet edit permissions in Jobscience. Users with edit permissions are able to perform and manage various administrative functions related to timesheets, including:
-
Submit hours or expenses on behalf of a worker.
-
Approve or reject timesheet hours.
-
Change the status of a timesheet in order to correct or re-submit the timesheet.
-
Perform hour adjustments to a previously approved timesheet.
-
Create a new timesheet for retroactive pay, bill rate adjustments, or pay rate adjustments.
Timesheet Edit Functions
You can edit data for, or adjust hours on, a timesheet from the Timesheet Detailpage.
From the Timesheet list page or from a Placement record, select the Timesheetlink to access the Detail record. On the Detail record, there are two edit buttons:
-
Edit - Opens the Timesheet Editpage containing primary timesheet data, including:
-
Period Start Date and Period End Date
-
Bill Rate and Pay Rate
-
Timesheet Status
-
Notes text boxes
-
-
Edit Hours - Opens the Hours Submissionpage that allows the admin user to:
-
Submit hours on behalf of a worker.
-
Edit hours submitted by a worker.
-
Submit expenses on behalf of a worker.
-
Approve or reject a submitted timesheet.
-
Submit hour adjustments for a timesheet that has been approved and billed.
-
Placement Timesheets
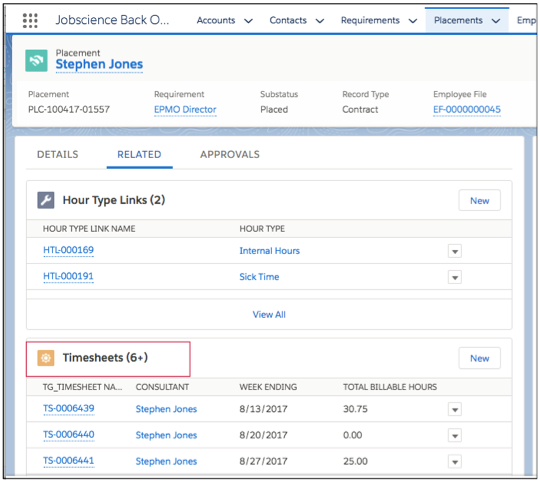
Timesheets are created for each Temp and Temp to Perm when the placement has all the required fields entered and when the placement is updated to "Active" status. The timesheets appear in the Relatedtab of the Placement.
Opening a Timesheet
-
Select the Timesheet Namelink.
Sample Placement Related Lists Page
Placement Hour Types
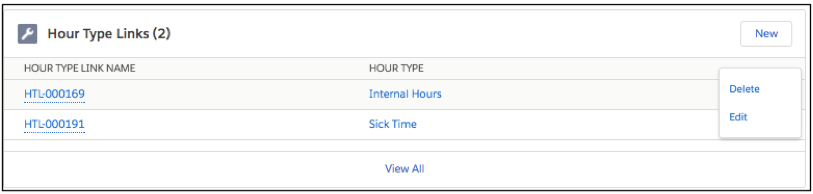
An Hour Type is associated with both the Placement and with each timesheet. An hour type allocates hours to specific categories such as Regular Time, Sick Time, Paid Time Off (PTO), etc.
To associate an Hour Type to the Placement:
-
Access the Placement.
-
Click the Related tab.
-
Click the New button in the Hour Type Links section.
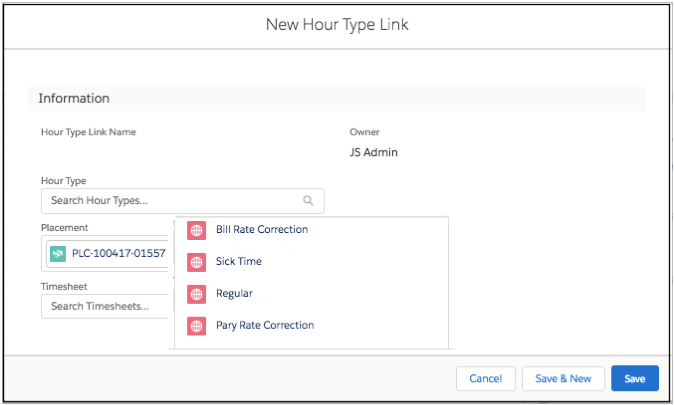
The New Hour Type Link page displays. -
Type the preferred Hour Type into the Hour Type field or simply click in the field to see the list of available hour types. Select an hour type and then click the Save button.
-
You can associate multiple hour types, as needed. When an hour type is associated with the placement, it becomes a selectable option on the timesheet.
-
If the worker is no longer eligible to charge hours to a specific hour type, delete the hour type from the placement by selecting the "Delete" option in the Hour Type Links section. By default, the hour type for each timesheet is "Regular."
-
Hour Type Setup and Rules
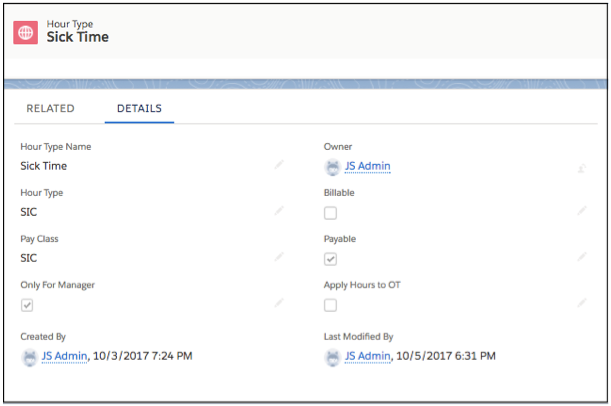
Hour types are created by the Admin team and contain the following fields/data:
-
Name - Descriptive name for the hour type.
-
Pay Class - Code that is used for timesheet hours tracking.
-
Only for Managers - If selected, the hour type is selectable only from the Timesheet Admin view. It is not available to the worker for selection.
-
Billable - If selected, the hours charged to the hour type are billable to the client and appear as a billing line item on the invoice. If not selected, the hours charged to the hour type are not billed on the client's invoice.
-
Payable - If selected, the hours charged to the hour type are payable to the worker and appear as payable hours in the payroll export. If not selected, the hours charged to the hour type are not payable to the worker.
-
Apply Hours to OT - If selected, the hours charged to the hour type count towards overtime accumulation. If not selected, the hours are not considered for overtime consideration. For example, assume the box is not selected for Sick Time and more than 40 hours constitutes overtime. If a worker submits 48 hours for the week, but eight of the hours are charged to Sick Time, the worker would not earn eight hours of overtime since time was charged to Sick Time. If the box was selected for Sick Time, then the worker would earn eight hours of overtime.
Editing from the Timesheet Detail Page
When editing from the Timesheet Detail page:
-
The Edit button allows you to edit the timesheet details.
-
The Edit Hours button allows you to enter hours, edit hours, and approve the timesheet.
Sample Timesheet Detail Page
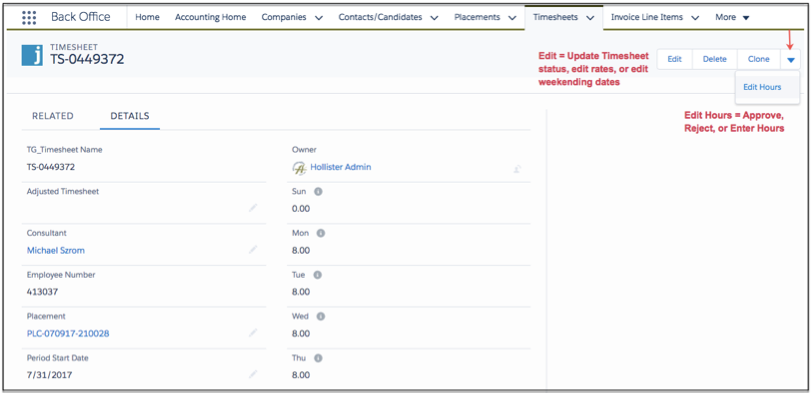
You can edit the fields on the page by clicking the Edit button or by clicking the Pencil icon next to the field that you want to edit.
Updating Timesheet Status to Correct Hours
If the hours on a timesheet were entered incorrectly, you can update the timesheet status back to "Pending" status to allow timesheet corrections.
To update the timesheet status:
-
Click the Pencil icon next to the Status field to display the Status drop-down list.
-
Select the "Pending" option.
-
Click the Save button.
The timesheet can now be edited and re-submitted for approval.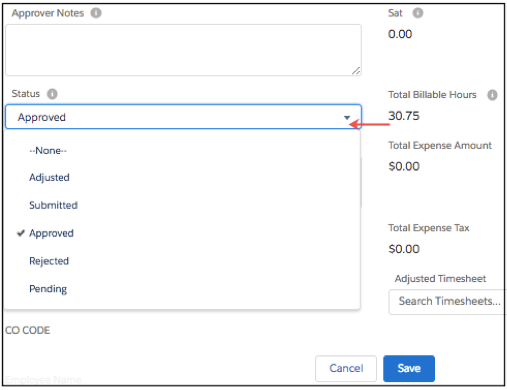
| Note: If invoicing has been completed for the week, and the timesheet has already been processed into a consolidated invoice, do not perform this type of timesheet correction. Instead, perform a timesheet adjustment or new timesheet correction. |
Entering or Editing Timesheet Hours
You can enter or edit timesheet hours from the Admin view for timesheets with a "Pending" or "Submitted" status.
To enter or edit hours:
-
Select the Edit Hours button from the Timesheet Detail page. The Edit Timesheet page displays.
Note:You may have to use the pull down arrow to get to the button.
-
Click the Edit button to enter or adjust hours.
-
Charge Number Field - Used to track/define tasks or projects.
-
Enter Hours - If the Timesheet type used (defined on the placement) is "Hours Only," enter the total hours in the field.
-
Start and End Times - If the Timesheet type used is "Start and End" time, select the start and end time for the day.
-
Hour Type - Select the hour type to charge to. The default is "Regular" time.
-
Notes - Enter any notes for the Submitter or the Approver to see.
-
Expenses - Enter any expenses on behalf of the worker from this Admin screen.
-
Attach Files - Attach multiple files, as needed (for example, receipts or reference documents).
-
Save - When all data is entered, click the Save button to save your entries without submitting the timesheet for approval.
-
Submit - Click the Submit button to submit the timesheet for approval. The timesheet is moved to "Submitted" status.
Note:After clicking the Save or Submit button, you will see total regular hours + any overtime hours.
-
Sample Edit Timesheet Page
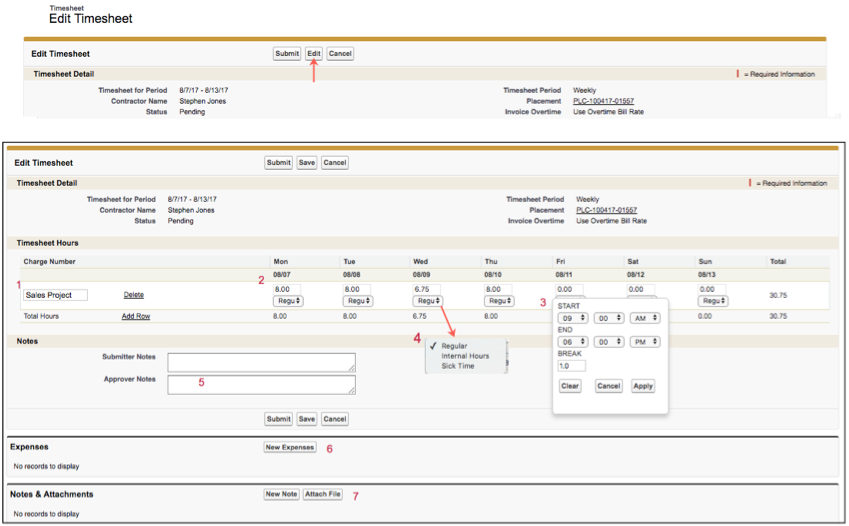
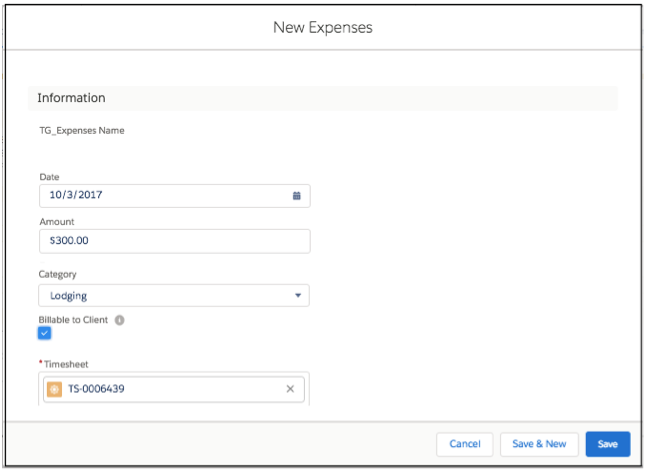
Submitting Expenses
-
Click the New Expenses button (#6) on the Edit Timesheet page. The Expense Submission page displays.
-
Enter all of the required information.
-
Date of the expense.
-
Amount of the expense, including any taxes.
-
Select the category for the expense.
-
If the expense is billable to the client, select the Billable to Client checkbox. If the expense is not billable, but is payable to the worker, do not select the checkbox.
-
The Timesheet field is pre-populated for the expense.
-
-
Click the Save button. You may enter multiple expenses, as needed.
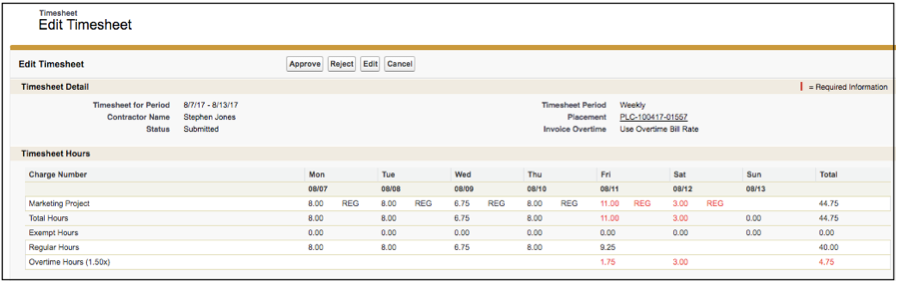
Approving and Rejecting Timesheets
To approve timesheets in "Submitted" status:
-
Select the timesheet.
The Timesheet Detail page displays. -
Click the Edit Hours button.
The Timesheet Edit page displays.
For timesheets in "Submitted" status, you will see:
-
Total regular hours and total overtime hours submitted per day and for the week.
-
Approve button - When clicked, approves the timesheet and creates an invoice line item for billing.
-
Reject button - When clicked, puts the timesheet into "Reject" (i.e., back to "Pending" status). The worker is notified via email notification and the timesheet becomes editable for re-submission.
-
Edit button - When clicked, allows for editing of hours or expenses, as needed.
-
The Placement link navigates to the Placement Detail page, as needed.
Sample Timesheet Hours and Approvals
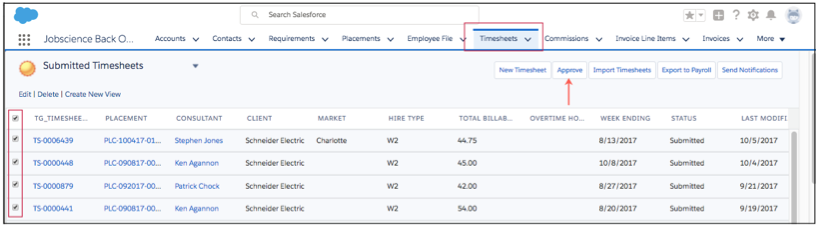
| Note:You can perform mass timesheet approvals from the Timesheets tab, as needed. |
Sample Timesheets Tab