| Package: Applicant Management System(AMS) |
Forwarding a Candidate to a User or Contact
![]()
You can ask another person to take an action related to a Candidate using the Forward feature.
To assign an action task:
-
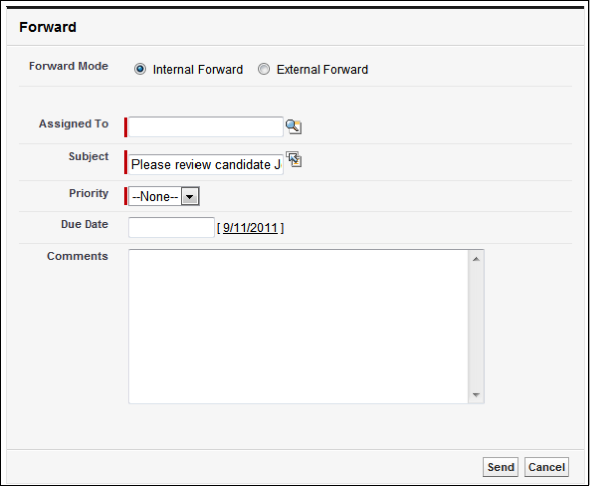
From within the Enhanced Applicant Management System, click the Forward icon in the Communication column for the Candidate you selected. The Forward dialog appears.
-
To assign the task to an internal user:
-
Select the Internal Forward radio button.
-
Next to the Assigned To field, click
 to open a search dialog and to select the person to whom the task has been assigned.
 -
Click
 to open a list of options for the Subject field.
 -
Select a value from the Priority drop-down list.
-
Select a Due Date by:
-
Clicking the box to display a calendar. This allows you to select any date.
-
Clicking the date link at the right. This inserts today's date into the field.
-
-
Optionally, enter Comments.
-
-
To send an email to an external user (Contact):
-
Select and display the External Forward radio button.
-
Next to the To field, click
to open a search dialog and to select the person to whom the task has been assigned. -
Enter another person's name in the Additional To field.
-
The CC field is automatically populated with the name of the user. You can enter a new name or click
to open a search dialog and to select a person to include in the CC field. -
Click
to open a search dialog and to select a person to include in the BCC field. -
Optionally, select a folder from the Folder drop-down list.
Note: Only folders that you have access to are displayed in the Folder drop-down list. -
Optionally, select a template for the email from the Template drop-down list. A template merges fields from the Candidate record with predefined text. If you select a template, the Message box is populated with text.
Note: Only templates that you have access to are displayed in the Template drop-down list. -
If you did not select a template, enter a Subject for the email; if you selected a template, the Subject field is populated with text.
-
If you did not select a template, enter a message in the Message text box; if you selected a template, you cannot enter text in the Message text box.
-
Place checkmarks next to the Attachments you would like to send.
-
-
Click the Send button to assign the task or click the Cancel button to discard your inputs.