| Package: Applicant Management System(AMS) |
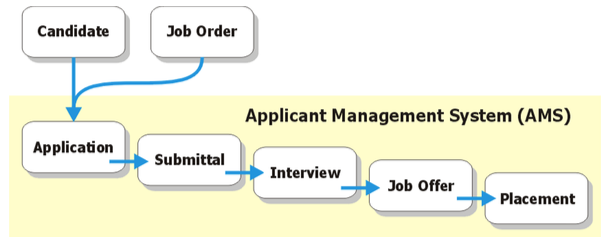
Applicant Management System Overview
![]()
The Applicant Management System panel provides a convenient way to monitor and manage the job placement process.
Filtering the List of Candidates
The seven tabs on the Applicant Management System panel filter the List View of Candidates according to their status in the placement process. The tabs select Candidates who:
-
Highest Status
-
Applications - are considered eligible for submittal
-
Submittals - have been presented to the hiring manager
-
Interviews - have had interviews scheduled
-
Offers - have received job offers
-
Placements - have accepted job offers
- Rejections - have been rejected for any reason
Processing Candidates
Place a checkmark next to one or more Candidate records in the List View and click a button at the top of the panel to:

-
Add Skills - displays the Add Skills panel, where you can edit the skill codes list associated with the Candidate(s).
-
Add Tags - displays the Add Tags panel, where you can associate searchable keywords with the Candidate(s).
-
Add to Short List - displays the Add to List panel, where you can categorize the Candidate(s) by adding them to lists.
-
Apply to a Job - displays the Apply to a Job panel, where you can search for and select a different job and create a new job Application.
- Reject Candidates - displays the Reject Candidates dialog, where you can select a reject reason and remove the Candidate from consideration.
In addition, each Candidate that appears in the List View may have up to nine additional buttons.

-
Edit - displays the Candidate Edit screen.
-
Resume - displays the resume from the Candidate record in a new window.
-
Details - displays selected details about the Candidate, including Activity History.
-
Move - displays the Move Status dialog, where you can progress the Candidate's status towards placement.
-
Snooze - displays the Snooze Candidate dialog, where you can set a reminder task to reinvestigate the Candidate's status.
-
Reject - displays the Reject Candidate dialog, where you can select a reject reason and remove the Candidate from consideration.
-
Email - displays the pre-addressed Email Candidate dialog.
-
Schedule - displays the Schedule Event dialog.
-
Forward - displays the Forward dialog, where you ask another person to take an action related to this Candidate.
Adding Skills to a Candidate
After displaying a Job Order screen or selecting a Candidate from a List View:
-
Display the Applicant Management System panel.
-
Place checkmarks to the left of the Candidates you wish to code for specific skills.
You may select all Candidates by selecting the checkbox to the left of the Action column. -
Click Add Skills to display the Add Skills dialog.
-
Optionally, select one or more skills that are required by the job from the Skill Codes list and add them to the Chosen list.
-
Select a skill from the Available list and click
 to add it to the Chosen list.
 -
Select a skill from the Chosen list and click
 to remove it from the Chosen list.
-
-
-
Click Save Skills to save your changes or Cancel to discard them. The Job Order screen reappears.
Adding Tags to a Candidate
After displaying a Job Order screen:
-
Go to the Applicant Management System panel.
-
Place checkmarks to the left of the Candidates you wish to tag. You may select all Candidates by selecting the checkbox to the left of the Action column.
-
Click Add Tags to display the Add Tags panel.
-
In the Tags already in use section, the Personal Tags and Public Tags drop-down lists show how the Candidate has been categorized thus far.
-
Personal tags are visible only by you.
-
Public tags are visible to recruiters who have access to this Job Order.
-
Optionally, enter a new tag in the Personal Tag field.
-
Optionally, enter a new tag in the Public Tag field.
-
-
Click Add Tags.
The Job Order screen reappears.
Adding Candidates to a Short List
After displaying a Job Order screen:
-
Go to the Applicant Management System panel.
-
Place checkmarks to the left of the Candidates you wish to add to a list.
You may select all Candidates by selecting the checkbox to the left of the Action column. -
Click Add to Short List to display the Add to List dialog.
-
Optionally, select an existing list.
This adds the Candidate to the selected list and redisplays the Job Order screen.-
Optionally, select and display the New List tab.
-
-
Enter a name into the Name field.
-
Enter description into the Description field.
-
Click Add to List to add the Candidate to the Short List or Cancel to discard your inputs.
This redisplays the Job Order screen.
Applying Candidates to a Job Order
After displaying a Job Order screen:
-
Go to the Applicant Management System panel.
-
Place checkmarks to the left of the Candidates you wish to apply to the job.
You may select all Candidates by selecting the checkbox to the left of the Action column. -
Click Apply to a Job to display the Apply to a Job search dialog.
-
Optionally, search for a job:
-
Click
 to open a search dialog.
 -
Enter a search term and click Go!.
-
Select a job from the resulting List View.
-
Optionally, select a job that is listed.
This creates new job Application(s) associating the selected Candidate(s) and the selected job.
-
-
Click Apply to Position.
The Job Order screen reappears.
Rejecting Candidates
After displaying a Job Order screen:
-
Go to the Applicant Management System panel.
-
Place checkmarks to the left of the Candidates you wish to reject.
You may select all candidates by selecting the checkbox to the left of the Action column.Note: You may revert rejections from the Rejections tab of the AMS. -
Click Reject Candidates to display the Reject Candidates dialog.
-
Select a Reject Reason from the drop-down list.
-
Click Reject to finalize the action or Cancel to do nothing.
The Job Order screen reappears.
Changing a Candidate's Status
Jobscience Recruiting has five status values to track a Candidate on the way to being placed:
-
Applications - are considered eligible for submittal (refer to Job Applications)
-
Submittals - have been presented to the hiring manager (refer to Submittals)
-
Interviews - have had interviews scheduled (refer to Interviews)
-
Offers - have received job offers (refer to Offers)
-
Placements - have accepted job offers (refer to Placements)
After displaying a Job Order screen:
-
Go to the Applicant Management System panel.
-
Click Move to the right of the Candidate whose status you wish to change.
-
When the Move Status dialog appears, select the next Status appropriate to the Candidate or click Cancel.
The Job Order screen reappears and that Candidate's Stage column is updated with the new Status.
Creating Reminders About a Candidate
After displaying a Job Order screen:
-
Display the Applicant Management System panel.
-
Click Snooze to the right of the Candidate's name. The Snooze Candidate dialog appears.
-
Optionally, select a Due Date:
-
Click the box to display a calendar and select any date.
-
Click the date link at right to insert today's date into the field.
-
-
-
Click Snooze to schedule the task or click Cancel to quit.
The Job Order screen reappears.
Sending Emails to a Candidate
After displaying a Job Order screen:
-
Go to the Applicant Management System panel.
-
Click Email to the right of the Candidate's name. The Email Candidate dialog appears.
-
Optionally, click
to open a search dialog and to select a person to include in the CC field. -
Optionally, click
to open a search dialog and to select a person to include in the BCC field.
-
-
Enter a subject for the email in the Subject field.
-
Optionally, select a Template for the email. A template merges fields from the Candidate record with predefined text. If you select a template, the Message text box is populated with text.
-
-
Edit the Message, as necessary. If you selected a template, any text you enter in the Message text box will be overwritten by the template.
-
Click Send or click Cancel to discard your inputs.
Scheduling Events With or About a Candidate
After displaying a Job Order screen:
-
Go to the Applicant Management System panel.
-
Select Schedule to the right of the Candidate's name.
The Schedule Event dialog appears. -
Click
to open a search dialog and to select the person to whom the event has been Assigned.-
Optionally, if you do not want to include the candidate, clear the Invite Candidate checkbox.
-
-
Click
 to open a list of options for the Subject field and then select an option.
 -
Select a Start date and time.
-
To select a date, click inside the date field and select a date from the calendar that displays.
-
To select a time, either click the link to the right of the time field to select the current time, or click inside the time field and select a time from the drop-down list.
Note: When you select a Start date, if the person to whom this event is assigned has other events scheduled on that day, then the Invitees Schedule List View is populated with start and end times. This prevents the user from scheduling two events at the same time.
-
Select an End date and time.
-
To select a date, click inside the date field and select a date from the calendar that displays.
-
To select a time, either click the link to the right of the time field to select the current time, or click inside the time field and select a time from the drop-down list.
-
-
Optionally
-
Enter a location in the Location field.
-
Enter a description in the Description field.
-
If you would like to invite others, click Add Other Invitees to display a search screen.
-
Make a selection from the Search within drop-down list. The options are:
-
User
-
Contact
-
User & Contact
-
-
Optionally, add a search argument.
-
Click Go.
-
In the Search Results List View, place checkmarks next to the persons to invite and click Insert Selected. The persons you invited are added to the Other Invitees List View at the bottom of the Schedule Event dialog.
Note: If any of the invitees have other events scheduled on that day, then the Invitees Schedule List View is populated with their name and the start and end times for their scheduled events. This prevents scheduling two events at the same time.-
Optionally, click Remove next to an item in the Other Invitees List View.
-
-
Click Done to save your changes or Cancel to discard them. The Schedule Event screen appears.
-
-
-
Click Save to create the event or Cancel to discard your inputs.
Assigning Action Tasks Related to a Candidate
After displaying a Job Order screen:
-
Go to the Applicant Management System panel.
-
Select Forward to the right of the Candidate's name.
The Forward dialog appears. -
To assign the task to an internal user
-
Next to the Assigned To field, click
to open a search dialog and to select the person to whom the task has been assigned. -
Click
to open a list of options for the Subject field. -
Select a value from the Priority drop-down list.
-
Optionally
-
Select a Due Date
-
Click the box to display a calendar to select any date.
-
Click the date link at the right to insert today's date into the field.
-
-
Enter Comments.
-
-
-
To assign the task to an external user:
-
Select and display the External Forward tab.
-
Next to the To field, click
to open a search dialog and to select the person to whom the task has been assigned. -
Optionally
-
Enter another person's name in the Additional To field.
-
Click
to open a search dialog and to select a person to include in the CC field. -
Click
to open a search dialog and to select a person to include in the BCC field.
-
-
Enter a Subject for the email.
-
Optionally, select a Template for the email.
A template merges fields from the Candidate record with predefined text.
If you select a template, the Message text box is populated with text. -
Edit the Message, as necessary.
If you selected a template, any text you enter in the Message text box will be overwritten by the template. -
Place checkmarks next to the Attachments you would like to send.
-
-
Click Send or click Cancel to discard your inputs.