How to Create Custom Fields in Bullhorn ATS
If you want to capture company-specific information that Bullhorn’s standard fields don’t cover, you can create a custom field. Custom fields allow your team to track unique data for entities such as jobs, placements, candidates, or contacts efficiently. This article walks you through the setup process so your custom fields are properly mapped and usable across your system.
Each entity has a limited number of custom fields. If you reach that limit or need to capture more structured information, you can create a custom object, which adds additional fields on a separate tab of the record.
Common Reasons to Add or Edit a Custom Field
-
You need to add a brand-new field to jobs, placements, candidates, or contacts.
-
You want to add or edit dropdown values in a custom field.
-
A custom field may not be showing up in search, list views, or reporting.
-
You want to reorder or group custom fields under specific headers.
-
You need to set up a new custom field for integration or payroll systems.
-
You want to make a custom field required.
-
You want to hide or unhide a custom field.
Create a Custom Field
You can add custom fields to all entities including Contacts, Candidates, Jobs, Companies, Leads, Opportunities, and Placements.
-
From the Bullhorn Menu, select Admin > Field Mappings.
-
Expand the entity where you want to add the field.
-
In the Field column, type "custom" and press Enter to filter for all custom fields.
-
Select an unused custom field from the list.
-
Make sure you choose a field type that fits your needs. See Custom Field Options for a guide to each field type and what it’s best used for.
Do not repurpose existing Bullhorn fields (e.g., changing the Status field to store emails). When adding a new field, always use designated custom fields.
-
-
In the pop-up window, complete the field settings:
Field
Description
Display The label users will see inside Bullhorn.
Edit type
Choose the edit type that fits your needs. See Custom Field Options for a guide to the different field edit types and how to use them.
Required Selecting this option will make the field mandatory when saving the record.
Hidden Selecting this option will hide the field from the record layout.
Allow Multiple Values Allows users to select more than one value.
Some field types do not support multiple values.
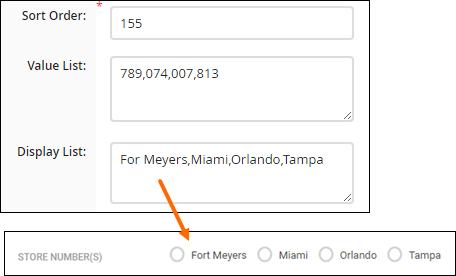
Sort Order
Enter the number that determines where this field appears on the Edit screen.
Sort orders must be unique.
Leave spacing between fields (for example, 130, 135) so you can easily add more fields in between them later.
Value List
Input the values users can select, separated by commas without spaces.
- Example: Tampa,Orlando,Fort Myers,Miami
Only required for fields that require users to select from a preconfigured options list, such as a custom drop down.
Display List
Leave this blank unless you're creating a custom drop down and want user-friendly labels for technical values.
Example: Use location names as the display list and store location codes internally.
Default Value Optional; Enter the value that should appear by default (if creating a drop down field, this value must also exist in the Value List).
Leave blank if no default value is required.
Description
Optional; A short explanation that appears under the field to help users understand its purpose.
Hint Optional; helper text that appears inside the field in grey.
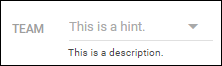
Hint text will only display on certain edit types, and will not show if the field has a default value.
-
Click Save.
-
You may need to refresh your Bullhorn session to see the changes.
-
Troubleshooting
If a field isn’t appearing:
Ensure it’s unhidden in Field Mappings and added to the correct entity. If your company uses multiple Private Labels, ensure the field is unhidden on the right Private Label(s).
If you get a character limit error:
Check the character limit of the field. A standard customText field has a limit of 100 characters. Use a customTextBlock field to store longer text.
If the field needs to store sensitive info:
Use customEncryptedText fields instead of standard text fields.
If a custom field isn't showing up in search, list views, or reporting:
There are two common reasons why a custom field might not be appearing as expected:
-
It's a customTextBlock: If the field was created as a customTextBlock, it's designed to hold large amounts of unstructured text and, by default, is not searchable. This means it won't appear in search results, filterable lists, or reports.
-
It's not in the Search Layout: Even if a custom field is configured correctly, it won't show up in search or list views unless it's explicitly added to the Search Layout. This setting, found under the View Layout, controls which fields are visible and searchable for a particular object or record type.
To resolve this, you should check how the custom field was initially set up. If it's a customTextBlock and you need it to be searchable, you may need to recreate it using a different field type, such as a regular text field. If it's not a customTextBlock, navigate to Admin > View Layout and add the field to the Search tab to make it visible and searchable.
FAQ
Can I repurpose an existing Bullhorn field for custom data?
No, existing fields should not be repurposed, as this can break system functionality. When adding a new field, always use designated custom fields.
How do I control who can edit a field?
The ability to edit a field depends on the usertypes that have edit permissions for that entity. E.g. If a usertype has the permission to edit Candidates, any custom fields on a Candidate record will be editable for those users.
Some system fields can’t be edited — for example, Encrypted or Confidential fields used for integrations or data protection (such as GDPR). These are restricted for security reasons and can’t be changed by standard users.
Can I set a custom field to be conditional based on another field's value?
No, custom fields cannot be set to be conditional on other fields. Bullhorn does not support this type of conditional logic for custom fields.
Can I make a field mandatory based another field's value?
Not as standard functionality. Conditional or stage-specific required fields can be set up as a custom field interaction by Professional Services. Reach out to your Account Manager to learn more about this option.
How do I set up a custom field for payroll or an integration?
Setup is like any other custom field. The integration will typically look for a specific field name (e.g., customText5, customInt7, customFloat2) rather than the field label. You should choose the appropriate data type (text, date, integer, or float) based on what the integration requires.