| Editions Available: All Editions | Audience: |
How to Disable a User Account in Bullhorn
When an employee leaves your company or a user account was created in error, you may need to disable that account. Disabling ensures the person can no longer log into Bullhorn while keeping your data secure and avoiding unnecessary fees. Before doing so, it’s important to transfer ownership of their records and recreate their Tearsheets and Distribution Lists, so nothing critical is lost.
Once an account is disabled, the user will no longer be able to log into Bullhorn (including Bullhorn for Mobile).
If you’re removing an employee and want to give their user seat to a new hire or teammate, follow the steps in Replacing a User Account. This ensures the license is reused and records transition smoothly without extra billing.
Common Scenarios for Disabling a User
When you need to disable a user in Bullhorn, it’s usually because something has changed with their account. Maybe the employee left, the account was created by mistake, or you need to hand off their records to another team member. Below are the most common situations where admins look for help with disabling a user.
- An employee has left the company and their account should be deactivated.
- A user account was added in error and needs to be removed from active billing.
- You want to replace an old user with a new hire.
- Records must be transferred from a disabled user to another team member.
- A disabled user’s records are not showing correctly for colleagues.
- You’re reassigning ownership of Tearsheets or Distribution Lists.
- You need to confirm why you cannot delete or disable a particular user.
Transferring a User's Records
Transferring a user’s records makes sure that important data (such as candidates, contacts, and jobs) remains accessible to your team. This is a crucial step if you find you have a user who can't assign candidates. Therefore, this is the first step you want to take when disabling or assigning records to new a user. For all related notes, attachments, and emails to remain tied to the records, update the Owner field to the new user.
If the user has more than 2,000 records for a single entity, use theTransferring Record Ownership Using the List View article for bulk transfers.
If the User is disabled without transferring their records to another user, you will be unable to use the User filter within the respective list view to locate these records, and you cannot mass transfer these Records within the respective list view.
-
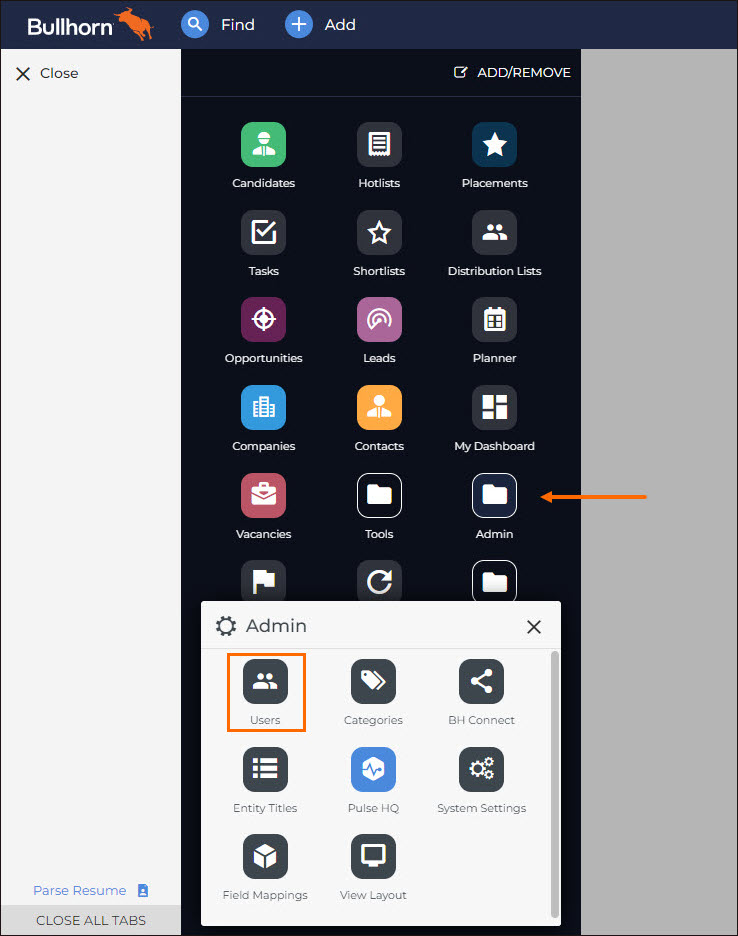
From your Bullhorn Menu, select Users.
-
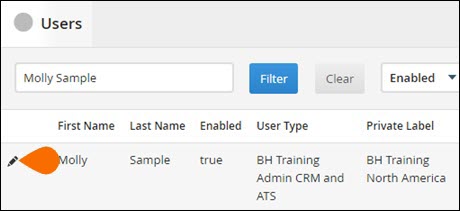
Select the pencil icon next to the user that you want to transfer records from.
-
Select Records Transfer located at the top-right of the screen.
-
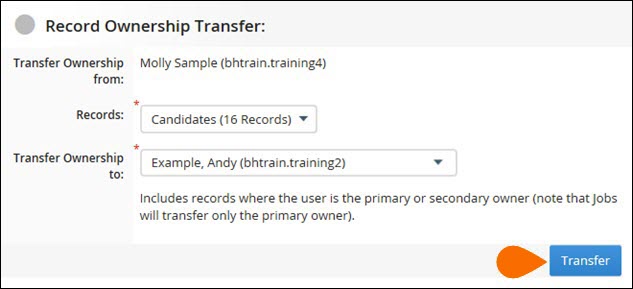
Select the corresponding entity using the drop-down to transfer records from the selected user account and include the user that you want to transfer the records to.
-
Select the Unassigned User if you don't have a determined user that is taking the records over.
-
-
Select Transfer to transfer the records.
-
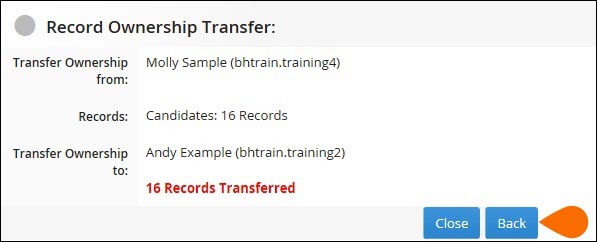
Optional Step: Repeat steps 4 and 5 until all records have been transferred from the user account.
-
Select Back to choose a different entity and perform step 4 again.
Recreate a User’s Tearsheets
Tearsheets created by a disabled user will no longer be editable. Recreating them ensures your team can continue managing candidate lists going forward.
For Private tearsheets, you must log in as the user to change them to Public before recreating the tearsheet.
- To set the tearsheet to Public, log in as the user and follow the Editing and Deleting an Existing Distribution List section of the Managing Distribution Lists article.
-
From your Bullhorn Menu, select Tearsheets.
-
Select the tearsheet name to expand the records on the tearsheet.

-
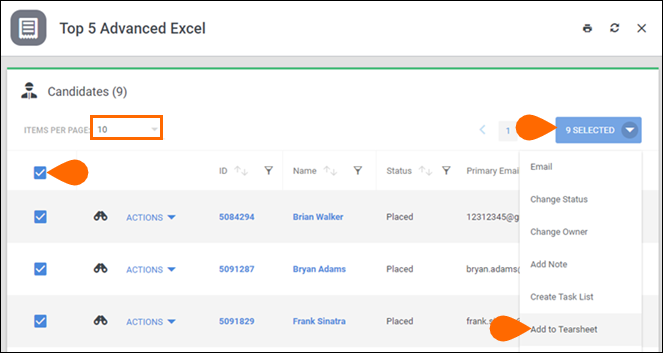
Select the Select All checkbox in the column header.
-
If needed, expand the tearsheet to display 100 records per page.
-
-
Click the Selected button.
-
Select Add to Tearsheet.
-
Select if you want to add to an existing to new tearsheet, enter the tearsheet name and select Save.
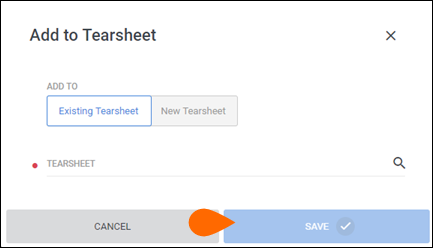
-
Optional Step: Repeat steps 3-7 as necessary
Recreate a User’s Distribution Lists (S-Release Only)
Distribution Lists owned by a disabled user may not be accessible later. Recreating them ensures your team retains access.
In Novo, this step isn’t required—you can view disabled users’ Distribution Lists directly.
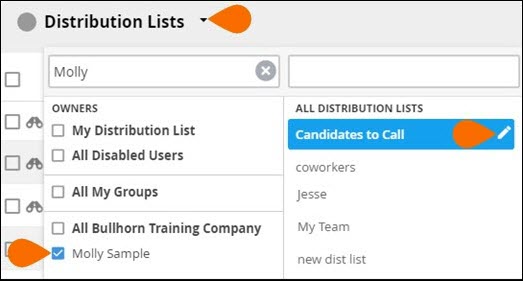
- Navigate to Menu > Home > Distribution Lists.
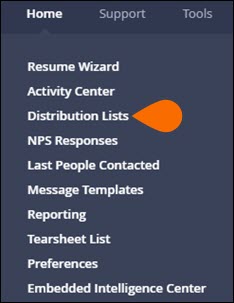
- Select the down arrow next to Distribution Lists.
- Select the checkbox next to the user you are disabling.
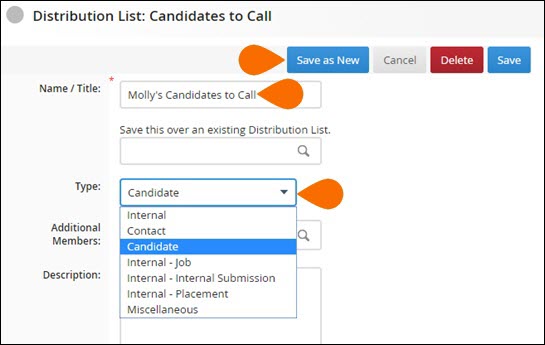
- Select the next to the Distribution List name.
- Give the Distribution List a new name.
- Change the Distribution List Type (if needed).
- Select Save as New.
-
Optional Step: Repeat steps 2-7 as necessary.
Disabling a User
Once records, tearsheets, and distribution lists are handled, you can safely disable the account.
You should only disable a user after transferring records and replicating Tearsheets or Distribution Lists as needed.
- From your Bullhorn Menu, select Admin > Users.
- Select the pencil icon next to the user that you want to disable.
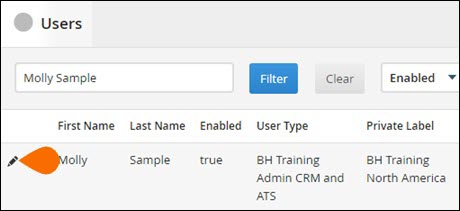
- Under Account Information, set Account to Disabled.
- Select Save at the top of the screen.
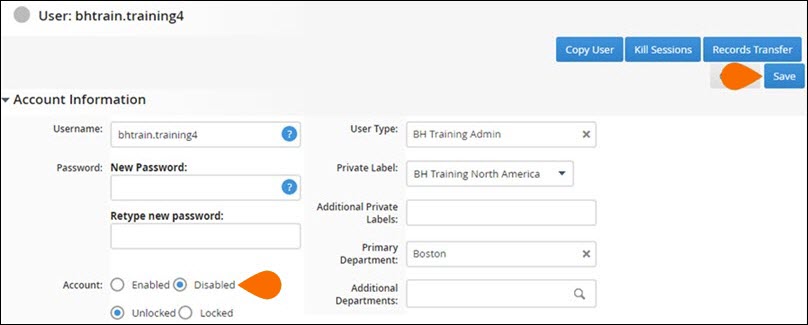
If you’re adding a replacement instead of re-enabling, see How to Add and Manage an ATS User Account.
Troubleshooting
Sometimes disabling a user in Bullhorn doesn’t go as planned. You might see errors, notice that records didn’t transfer, or find that colleagues can’t access the disabled user’s data. This section highlights the most common issues admins run into and how to fix them quickly.
-
If you can’t disable or delete a user: Ensure you have transferred all records and recreated Tearsheets/Lists. Some accounts cannot be deleted due to contract or data dependencies.
-
If records from a disabled user aren’t showing for colleagues: Verify ownership transfer was completed. Use the List View bulk transfer if needed.
-
If you get an error while disabling: Check whether the user still owns private Tearsheets or Distribution Lists. Convert them to Public first.
-
If you need to reassign records still owned by a disabled user: Use Records Transfer or the bulk List View transfer method.
-
If you want to pause an account for leave: Disable the account temporarily; it can be re-enabled when the user returns.
-
If duplicate user accounts exist: Disable the duplicate and transfer any records to the correct user.
-
If a user can’t assign candidates: Verify their account status and role permissions; disabled or restricted accounts cannot perform assignments.
FAQs
Q: Can I delete a user account instead of disabling it?
A: No, user accounts cannot be deleted. Disabling is the correct process.
Q: What happens to a disabled user’s records?
A: You must transfer them first. If not, colleagues may not see those records, and bulk transfer later becomes harder.
Q: Can I replace a user with a new hire?
A: Yes. First disable the old user, then create a new user account for the replacement.
Q: Will I be billed for disabled users?
A: No. Only active or re-enabled accounts count toward billing.


