Text Fields
Overview
This article highlights the steps to add a Text Field to an Onboarding document.
Steps
- Navigate to the Onboarding tab.

- Select the Documents tab.

-
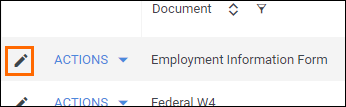
Select the document you will be editing.
- If you need to upload a new document, see Uploading a New Onboarding Document.
- If you need to upload a new document, see Uploading a New Onboarding Document.
- From the field bank on the left, select Add New.

- Drag Add Text Input from the field bank to the desired location on the document.
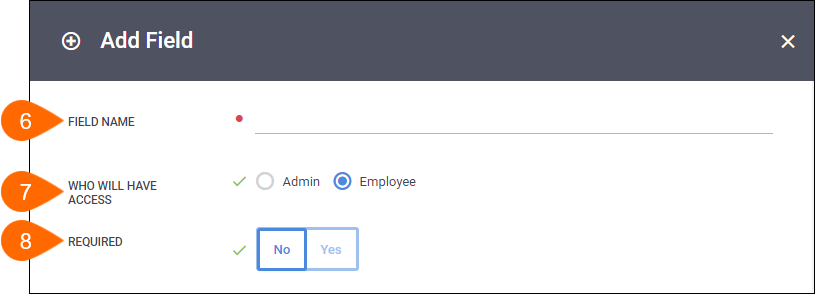
- The Add Field window will open so you can adjust the field settings.

- Enter in a name for the field.
- Choose who will complete the field.
- Select if the field is required to be completed.
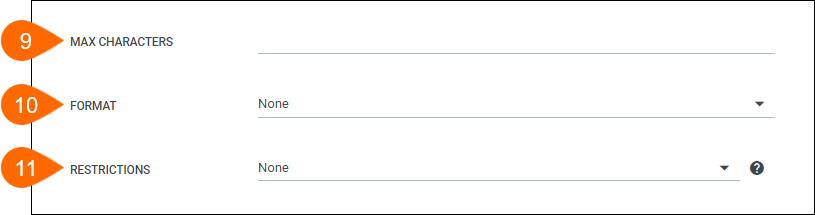
- If necessary, enter the maximum number of characters the field will contain.
- Select a predefined format to quickly define character restrictions, if desired.
- None - no formatting will be applied
- Phone Number - (999) 999-9999
- SSN - 999-99-9999
- Tax ID - 99-9999999
- Currency - symbol based on system defaults
- Define any character restrictions you wish to enable.
- None - allows all characters
- Only Numbers
- Only Letters
- Only Letters and Numbers
- Custom - use a combination of inputs below to define your format.
- Enter "0-9" to only allow numbers.
- Enter "a-z" to only allow letters.
- Enter "a-z A-Z" to allow capital letters, spaces, hyphens, and single quotes/apostrophes.
- Select a Source of field, if necessary.

- Select Save to confirm your changes.

Next Steps
The following articles provide additional information on customizing how your fields will display.
Was this helpful?