Tempo Touchless Enablement Steps
Overview
Below are the steps for enabling Touchless Options on a Tempo.
Requirements
- Site is setup for Tempo with version Tempo 3.5.0.0 (or higher).
- Tempo has an attached camera.
QR Mode
Enabling the clock for QR Code as an “Entry Method”
- In the Time Management Console, go to Maintenance > Administration > Clocks.
- If the clock has not been created yet, click on “Add New Clock”. Otherwise, click on the Tempo clock you wish to enable for QR code.
- When the clock is set up for Tempo, the Tempo Clock Parameters will be available to be configured. In these settings, select the Entry Method as QR Code.

Set Up the Punch Flow
A punch flow is how the flow of punches work on the clock. After selecting the entry method, the punch flow should also be configured properly. The punch flow is determined on a schedule in Touchless Schedule.
- Click on Schedule Configuration to open the config UI.
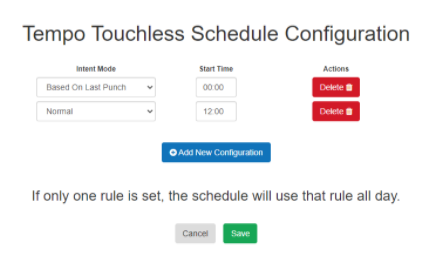
- The three options are “In/Out Schedule”, “Based On Last Punch”, and “Normal.” “Normal” is the default setting if no schedule is configured.

Schedule Configuration
Both In/Out Schedule and Based On Last Punch can be set to a specific schedule in Schedule Configuration.
- To configure a schedule as based on last punch, set the intent mode as Based on Last Punch. For the clock to only be based on last punch set the start time as 00:00. This will set the whole day for based on last punch.
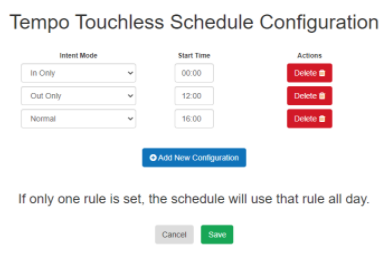
- To configure an In/Out Schedule select “In Only” or “Out Only”.
- When “In Only” is set, the start time is the start time at the clock and will use that setting until the next intent mode and start time.
- For example, from the image below, the clock would start the day as “In Only” and will switch to “Out Only” at 12:00. At 16:00, the clock switches to a normal mode, or allowing for either in/out based on the employee selection.
- This feature can be used to set one clock as “In Only” for the whole day and another clock at the site as “Out Only” for the whole day. This would be two different schedules on two different clocks.
Set Up the Dept Flow
- When “QR Code” is the entry method, the Dept Flow dropdown is now visible. This will allow the employee to either select their department (aka “Emp Selection”) or bypass and use their primary department.
- The “bypass” setting means the employee would not have the ability to select their own department, which requires less touching of the clock.

Get QR codes for the employee(s)
There are two different ways to retrieve the QR code for the employee(s).
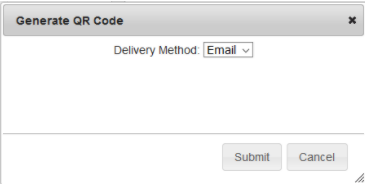
- The first way is through the time management console in the web dashboard view for the client or clock. The upper right corner will display “Generate QR Code”.

The user needs to have the “Call Center View” disabled on their role to see the “Generate QR Code” on the site that is setup for QR Code.
- After clicking on “Generate QR Code”, the user has several options to retrieve or send the QR Code.
- Email: Send the code to all the employees that have an active and setup email address in BTE.
- Text: Send the code to the employees with a setup phone number AND carrier information in BTE. There is no validation of which employees are valid with text and email information. Only the employees with the valid information will receive the text or email with their QR code from BTE.
- Download: Create a PDF report and download it to the user’s computer immediately after completing. Here is a sample of that report. The QR codes can then be printed out and hand delivered to the employees.
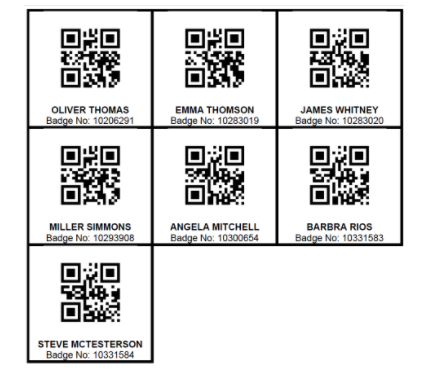

The text and email view the employee sees is similar to the download report for all employees.
You can also get a QR code is for a single employee in Employee Setup. Click on Maintenance Menu > Employee Setup. Then click on Generate QR Code under the Badge No. The actual QR code that is generated is the badge number of the employee at the site. The user has the same three receiving options as listed above.